Saturday, October 18, 2008

Flagstone Floor - Part 4

There's very little evidence that I'm doing anything but taking pictures at our house site. Unfortunately, with the exception of a few PVC drains sticking up through the floor, this first picture does nothing to dispel that myth. Here you can see the mason grouting the joints in our kitchen floor, with my wife in the background, cleaning off the sandstone before the grout stains become permanent.

Natural sandstone (technically, ours is siltstone) is more porous than most slate or man-made porcelain tiles, and therefore more apt to staining during the grouting process. Possibly, one could seal the stones before grouting, but the sealant might hinder the grout from sticking in the seams. With this in mind, my wife searched for and found a product that promises to solve the dilemma.

Known commercially as Grout Easy, this chemical mixture is applied (with a brush) to the stones immediately before the grouting process. The gaps between the stones are grouted, and then the unwanted grout as well as the underlying layer of grout-easy are removed once the grout hazes over.

The product helps tremendousy, but it is not a panacea. The right side of the large square stone in middle of this last picture was partially covered with Grout Easy. After cleaning, you can see where the grout easy was and where the grout easy was not. Even after using the Grout Easy, it looks as though we have a slight haze on all of our stones. I'm going to accept my wife's not-so-subtle invitation now to stop typing, and start scrubbing.

By the way, I've just noticed that this is my 150th blog posting! Yee-haw.

Thursday, October 16, 2008

A Pile of Work in Front of Us

My neighbor has been using my backhoe a few hours each day after work to collect rocks and pile them in our front yard. In the course of a week, he has used 15 gallons of diesel, but he has accumulated quite a pile of rocks! Some of these rocks weigh over a ton each. (you might find the 3 gallon bucket in the picture to get a sense of scale). These are rocks that were laying on top of the ground here on our farm, exposed by years of erosion.

We have a home-built hydraulic stone splitter, but these rocks are simply too heavy and too thick for it, so I plan to score these rocks 2" deep with a gas chop saw, then drive steel chisels into the grooves in order to split them into manageable chunks. These chunks, we will dress with a chisel to create the stones that will face the main tower on the front of the house. The "pitch faced" look will be similar to the small tower, but with arched windows and a slate roof atop (instead of a castellated balcony). One of the stonemason's sons plans to visit in a week or two and help with the stonework on the exterior of the house. The fall weather is perfect for this kind of outside work and I think we've got enough rocks to get him started!

Tuesday, October 14, 2008

Flagstone Kitchen Floor - Part 3

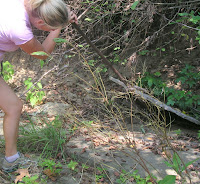
About a third of the way into the kitchen flooring project, I burned out on kitchen flooring. I made a deal with my wife "If you'll finish the kitchen floor, I'll do the plumbing." She cut and fit the remaining 2/3's of the stones for the floor, and mortared most of them down with thinset. Before she finished cutting and fitting all of the stones, we had to go on another expedition to find some more stone. The picture on the left shows what it typically looks like when we find it. Next spring, these same stones won't be here on the creek bank... tree roots, freezing water, and gully washers break them up and move them further down stream every year. Copperheads and poison ivy are par for the course, so we try to be careful when turning over rocks for the first time.
With just a few more stones to glue down, the stonemason paid us a visit, and gave us some advice for grouting the floor. Rather than take his advice on how to best apply the grout, we hired him to grout the seams! There were several more stones to mortar to the floor, so we let him do that too! Right off the bat, he was able to get the stones a lot flatter than we were, making us look bad. (but not too bad!)
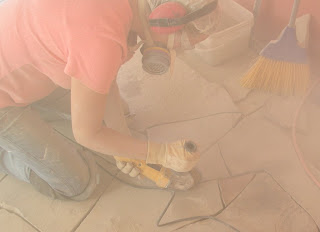
Before he started grouting the seams, the mason told us that he had one big concern. He felt that the joints were too tight to allow enough grout to get into the seams. With just a tiny amount of grout in the seams, he thought it would not be strong enough to stay put. His suggestion... grind out the seams with our angle grinder, using a wider diamond encrusted masonary blade. A week earlier, my wife had worn out the first set of motor brushes in our angle grinder... fortunately I had ordered another set of brushes and they showed up before the stone mason began this next step. (in the mean time I had filed off the limit stops on the motor brushes, to get a few more hours of life out of them!)

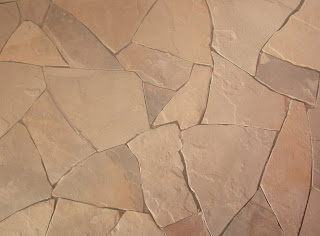
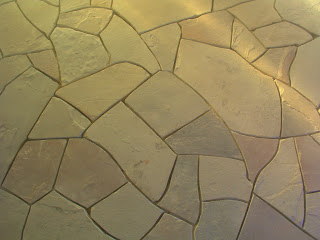
The stone mason has been grinding most of the joints, but that's my wife in the first picture grinding some of the joints while he's gone. This is a super dusty job. The results are nothing short of amazing, and the joints are very consistent. Below is a before and after picture of the flagstone flooring. No doubt, the stone mason's suggestion will give us a more durable and better looking floor.
By the way... all of these stones were cut and trimmed with solar power!