
Dovetail Details
 When people think of the joinery that holds a timberframe together, they probably most often think of the "pegged mortise and tenon joint." However the "wedged dovetail joint," is just as important in traditional timber frame houses. The dovetail joint is used on the ends of floor joists (and roof purlins), to connect them to girts and summer beams (and pricipal rafters). If executed properly, these dovetails fit tightly and will actually help pull together the girts (and rafters). Unfortunately, due to their placement, these beautiful dovetail joints are never seen once the house is finished!
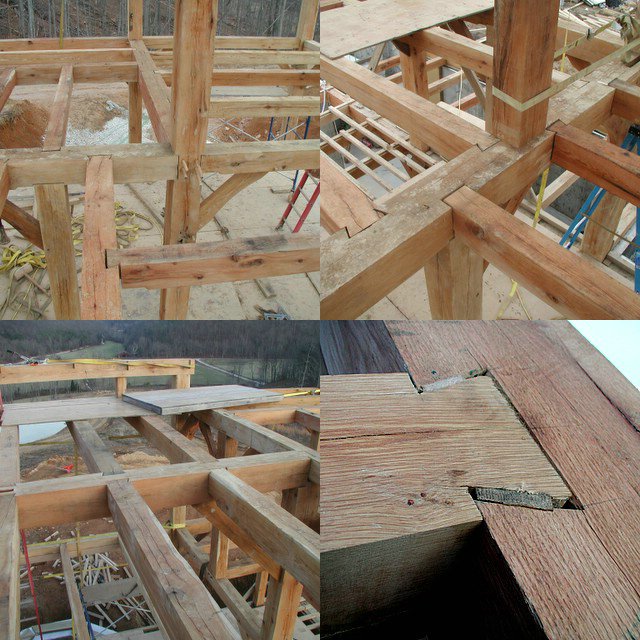
 We cut our male dovetails a bit undersized ("take the line") and our female dovetail pockets a bit oversized. Then we used a homemade jig to test each piece before calling it done and stacking it in the barn. Assuming one gets the length right (shoulder to shoulder), on raising day, the joist or purlin should theoretically drop right in. OK, maybe 70% of ours have dropped in like they should have... while on average the other 30% put up a fight! After we had the bents square, and the posts plumb, we went around driving dried hardwood wedges into the dovetail joints. As you can see in the lower right picture, this really pulls the joint tight. In the bottom of the uppermost leftmost picture, you can see an 'ornery oak 8x8 joist that has bowed, causing a gap where the oak 6x8 joist is joined to it. When we drove the wedges in, you can bet that 8x8 had no choice but to bow back into shape.
In the old barns here in KY, the old timers used simple lap joints to join the hand hewed sill plates. If you're judicious about it, you can substitute this simple lap joint for a dovetail joint in order to save time. I did this on the 1st floor occasionally, but rarely on the upper floors (as shown in the upper right hand picture).
Of course, cutting the dovetail notch into the supporting beam weakens it, so you don't want the notch to be too big. One book recommended 2.5" long dovetails and one book recommended 3" long dovetails. Not having any real basis for an opinion of my own, I started using... you guessed it 2 3/4" long dovetails. But one day we were invited to a TimberPeg frame raising in Cinci, OH. and there I got to see what kind of joinery their German CNC machine cuts. It was an eye opener, since they departed from traditional joinery here and there to make joints easier (or possible at all) for the CNC machine to cut. I noticed that their dovetails were a scant 1" to 1.5" long! (see the pictures below and compare the joints to the pegs which are presumably 1" in diameter) After this revelation, I decided to begin using 2" long dovetails in my own frame, where I was concerned that 2 3/4" dovetails might unneccesarily weaken the beams. (in leftmost, bottommost picture in the picture group above I have used both 2" and 2 3/4" joints on the ends of 8x10 joists. hmmmm... hard to see a difference... maybe I'm sweating something that doesn't really matter!)
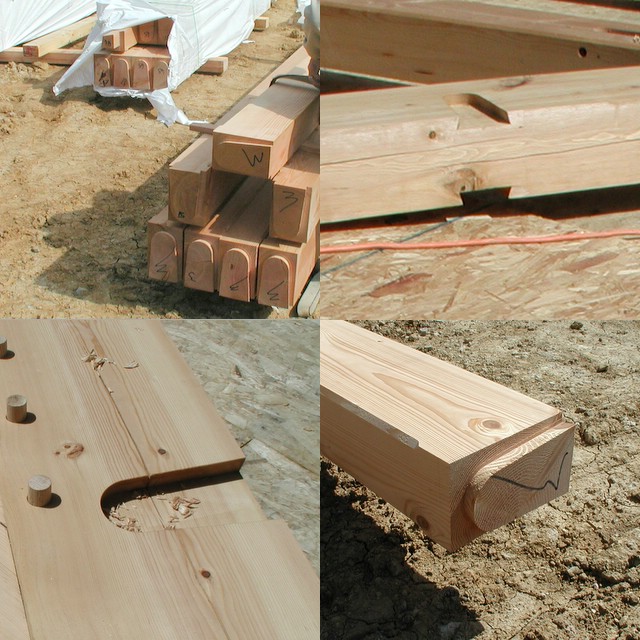
<-- TimberPeg joinery, presumably cut with a Hundeggar CNC machine.
posted by Thomas Massie at Wednesday, January 25, 2006
![]()

2 Comments:
By the way, very good blog. I have enjoyed reading it. You have a wonderful home in progress and I envy you new skill.
I love blog. I am going to attempt the same thing here in okc, ok with a barn. I know you state you made 2 3/4 dovetails and sounds like you used a router. Could you tell where you got a bit that big or how you did it. My email is tcreasey@carterhealthcare.com. Thank you
Travis
Post a Comment
<< Home