
Rubble Rousers
 As it turns out, the ground beneath our farm contains several even beds of fine grained sandstone (aka siltstone). In fact, sandstone was once quarried in our county (100 years ago) and sent all over the country (e.g. Chicago and New Orleans). Evidence of that the stone was once highly valued can still be found -- our stately courthouse is built of it (c.1939) , and abandoned quarries are still marked on the topo maps. Unfortunately, most of the knowledge of how to work this stone disappeared when the quarry workers passed away.
 The stone is hard to ignore on our farm ... it pops out here and there on old eroded logging roads, and 12" waterfalls flow over the exposed beds in the creeks. Where the weather has liberated the stone completely from the ground, it usually comes out in nice rectangular chunks. It was slow going clearing the ground for our house site, because everytime I saw a rectangular rock, I had to jump off the dozer and put it in my "save" pile. Surely these "freestones" deserved a place in our house.
Building the road to our house site unearthed even more nearly-square stones, but it was clear that many more stones would be needed for our timberframe house. And a lot of these freestones would need "working." I showed my collection of stones to a Welsh stonemason and to Mr. G, my 7th grade science teacher (who, among other things, is the resident authority on local geology). When asked whether these particular stones were worthy of building a structure that would last hundreds of years, they both answered emphatically - "of course!"
 I met the Welsh stonemason through a friend of a friend. He showed up for several days, splitting the rocks with chopsaw and chisel, and facing the resulting rectangles with a chisel and mallet. The look was nice, but my wife worried that they were almost too formal... "it'll make our house look like the courthouse," she said. I worked beside him for a few days, serving him lemonade, and listening to his windy stories about all the things he had done in life and all the things he could do. After making about 6 pallets of stone (and getting paid for the 6th) the stonemason failed to show up one day. In fact, that was over a year ago and I haven't seen him since. (I later heard that he had a nasty break-up with the friend's friend.) Fortunately for me, he left me with his hammer and chisel and a little bit of know how.
After he left, I made about one more pallet of stone in his "pitch faced" style. Man, it was rough work. I was starting to see why all of the quarries were abandoned in our county! Through out all of this, Mr. G. had been dropping by and telling me that you could split this stone easily with something like a log splitter. The stonemason had vehemently disagreed with this proposition... "Sounds like a typical American idea! hmmmph! Why, you'd have no idea of where the fracture would occur, if you didn't do it by hand, chisel, mallet, and use a keen eye." But the stonemason was now long gone, and I needed at least 40 more pallets of stone for my house.
For ships-and-giggles one day, I borrowed a hand operated log splitter and put a rock in it. Mr. G stopped by just in time to see me try this... pump, pump, pump... craaaaaaaaaack! A perfectly square split with nearly zero effort. He didn't even need to say "I told you so"... it was ringing loudly in my head as soon as the first stone cracked.
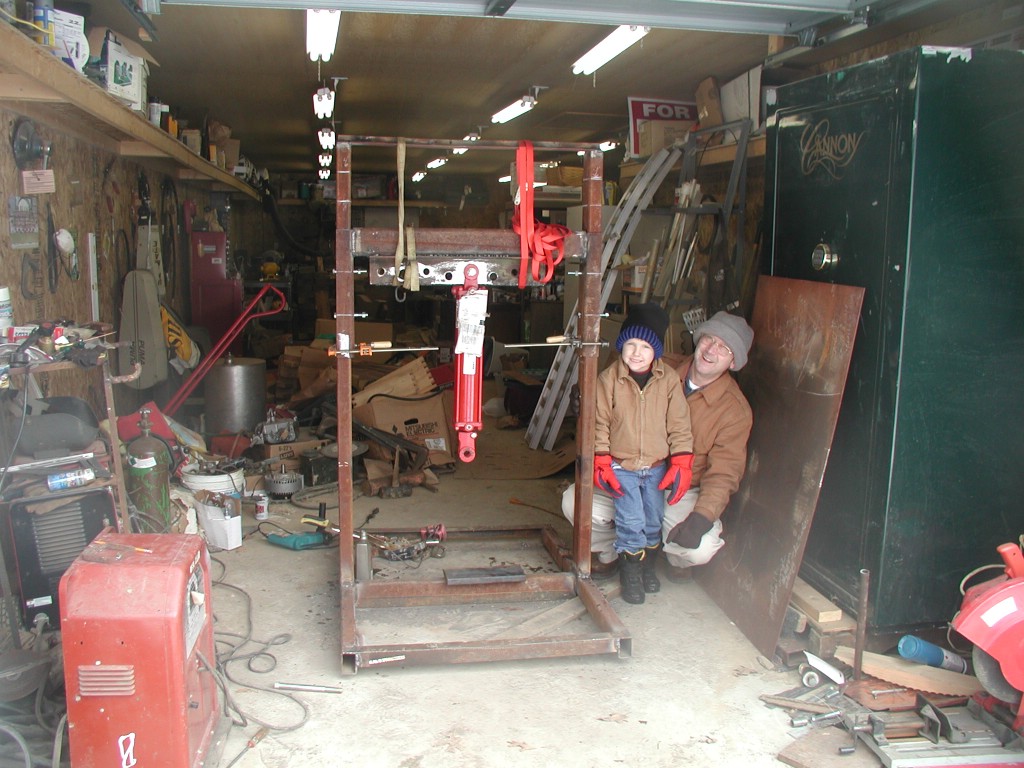 To shorten a long story (that seems to be getting longer as I type this), I pulled together all of my scrap steel and bought some hydraulic cylinders for the "rock-biter" that Mr. G and I were already drawing in the dirt. The hydraulic rams would be powered by tractor hydraulics, and the contraption could attach to the 3pt hitch on the back of tractor - making it mobile. Scoffing at my MIG welder, Mr. G brought over his Lincoln buzz box and got to welding the heavy steel. (That's "rock-biter v1 in progress," Mr. G., Mr. G's buzz box, and one of my sons in the picture.)
Version one worked, but it worked like... uh let me search for the word... ah there it came to me... it worked like crap. It split rock, but not consistently where we wanted it to split. We split about 50 rocks with it, but our scrap pile was growing faster than our "keep" pile. The splitter even stalled out on a few wimpy 6" thick rocks - clearly we would need that second hydraulic cylinder. Glad the stonemason wasn't around to see Version 1!
Back to the drawing board... or should I say, back to the (web)crawling board.... We set aside our waning pride and got on-line and looked at some giant commercial versions of stone splitters. We scrutinized, we slowed down the video clips, we studied. Aha, Mr. G. spotted it first. "Go back to that frame... you see that... the bottom table moved a little... it floats on springs and there are wedges on the bottom too - that come up through the table." That _was_ the secret.
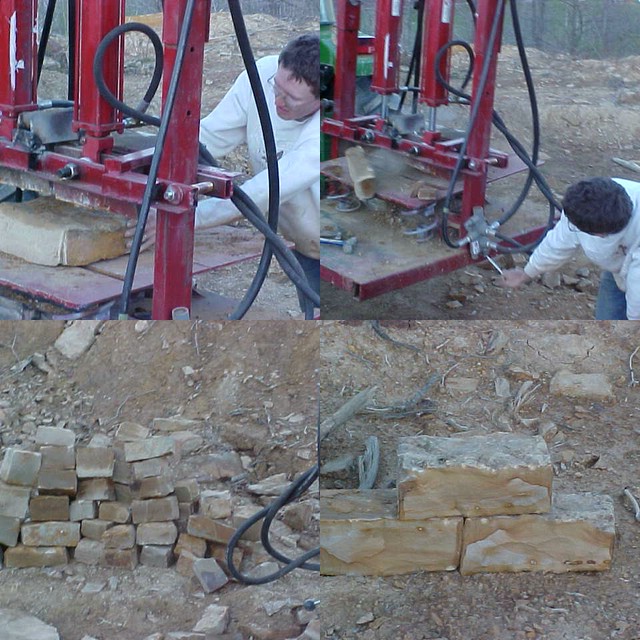 Mr. G. went to the local junk yard and found some car springs. (The proprietor wanted $1, Mr. G. offered 50 cents and they begrudgingly settled on 75 cents. This is how business gets done in eastern Kentucky. If you're not from around here and/or unfamiliar with the dance, you'd better just pay the asking price... or you'll leave the junk yard without any springs and no amount of money will buy them.) I got on line and ordered two more log-splitter wedges. Version 2 (shown here), debutted 2 weeks later, and worked like a charm. In less than 8 hours, we split at least as much stone as the stonemason had in about 30 hours. (and we were making good stone out of the ones that he had rejected because they would have been too much work to square up by chisel). Furthermore, the stone split so squarely and so consitently with a clean natural face that we didn't have to "work" the faces with a chisel - quelling my wife's concern that our house would look too formal.
Mr. G. busted version 2 last week on a particularly stubborn rock. In retrospect, the piece that broke was embarrassingly undersized for the job. So, after one more trip to the local metal-yard, we now have the parts to build version 3 (which is basically just version #2 beefed up).
posted by Thomas Massie at Sunday, May 14, 2006
![]()

21 Comments:
The original metal was 1/8 inch thick walled 1x2 and bent where the 1 inch case hardened bolts came through. The new metal is 1/4 inch 2X4 metal with equally beefed up crossing bracing and 1 inch thick metal and 2x4 at the major stress point. Triple welded seams filleted on for extra strength. That oughta "geter done". Real pleased witht he quality of the product and the minimum waste produced.
J. Gilbert
August 2007,
The "rock biter" is being run just about every day and has for the past month or so. It still is working well and the stone mason is laying rock as they split it out on the rock biter. A clevis has cracked on the piston but the thickness of the rock it has split is impressive and the quality of the splits are good. Thomas still has a lot of rock to split for the huge fireplace and chimney. It has more than paid for itself already at the prices asked for a pallet of even unfaced stone. At the price of a pallet of split faced stone it has saved them a lot of money and time and the results are impressive when laid.
Mr. G
well here it is Feb. of 2008. The Rock Biter is still chugging along and Thomas is laying up the rock for his huge fireplace in the great room. It is really impressive with arched and keystoned openings and pizza oven and stone mantle. I am not unhappy with the performance over time of the rock biter. It has proven to be a real timex piece. It takes a "licking and keeps on ticking".
The only improvement I would make is to add carbide edges to the blades. I have been really impressed with the carbide edged stone chisels they are using for trimming rock on the split faced rock for the fireplace. The rock biter has proven itself with a huge number of pallets of quality split faced stone produced for facing the house and working up the fireplace.
Mr. G
Great work on the stone splitter. Would you be able to post some higher res photos of the splitter? Particularly of the table/spring arrangement. Thanks.
Thanks Greg,
I can't promise anything, but I'll try to get some better pics of the springs. Basically, car springs, cut down shorter... welded to the chassis at one end of the spring. The other end of the spring fits snugly around a short round segment of pipe welded to the floating table. This way, the floating table can be removed by simply lifting it off the springs. The floating table definitely seems to be the key.
whoops. I got that backwards... the springs are welded to the table, and the pipe segments (spring guides) are welded to the chassis... as the fuzzy pictures clearly show. :)
Well I finally got around to building my splitter. I had a few problems, so I'm officially on version 2 :). I'm curious if you ran into cylinder synchronization problems? I ended up with a divider/combiner valve to get my cylinders in sync. I had a problem with my initial blade guide and had to beef that up. Also I am finding the wood splitter wedge/blades to be unsuitable for the task. Did you purchase yours from Northern Tool? I did and I'm getting significant wear on just a few stones. Did you sharpen yours to a point? I'll use them for now but plan to try some AR400 plate next. Thanks for the pointing out "the table on springs". I hadn't notices this on the commercial ones. I went a slightly different route and installed a hydraulic cylinder to control the height of the table. Not sure if I can post a link, but here goes... http://www.carter-engineering.com/images/stonesplitter/stonesplitter4a.JPG
and
http://www.carter-engineering.com/images/stonesplitter/stonesplitter5a.JPG
GregC,
That looks awesome - definitely beefier than ours! Nice welding and material selection!
I'm not sure, but I think if you introduce a few more "floating" degrees of freedom, yours might work even better. Instead of welding the upper end of our cylinders to the frame, we pinned them to the frame, so they can deviate a little bit from their "perfectly vertical" orientation. I'm pretty sure this keeps the whole shebang from binding, but I'm not sure if it is a neceassry feature, as we never tried welding the cylinders directly to the frame. Also, the big bar that carries the wedges is free to pivot a very considerable amount (on ours). This seems to be key... because if one cylinder starts extending more than the other (which it often does a little bit before they both start moving), it will not bind the mechanism. As soon as the "biter" reaches the rock, the other cylinder kicks in and levels things out. Then when both cylinders have reached the end of their free travel and the biter has self-aligned with the top of the stone, the biter splits the stone. We also let our wedges pivot within the wedge carrier. Dang, I need to put someting on you-tube. You could probably see flaws in our design, and make yours better, by watching ours split some rock.
Our wedges (two on top and two on bottom) are from Northern Tool, and they are not nearly as sharp as when they were new, but they seem to split the stones just fine. They just seemed to reach a steady state of dullness after a while. I think it should matter, but in reality it doesn't seem to matter than the wedges are duller than a widow's lawn mower blades.
Floating bottom table was part of our V2 design - and super critical to the workings. As it turns out, our rock biter had been sitting for over a year, but I got it back out this summer and split several tons of rock and it worked fine and nothing broke. I'll try to update the blog with better pics and maybe a video of the splitter.
-Thomas
Hi Thomas,
I had originally left the tops of the cylinders float. They actually have an "eye" welded to the top (which I'm currently not using). But unfortunately my blade guide was too wimpy, combined with the cylinder sync problem meant that I only had about 1" contacting my guides. This allowed the blade to twist. So I did a number of things at once, installed the divider valve, beefed up the guides, and welded the cylinders. Thinking back I probably should have beefed up the guides first and seen how it went. It's probably not clear in the pictures but those are actually homemade clevis on the end of the cylinder rods. So the blade can have some differential. I purchased off the shelf cylinders that were designed to be use in a press. So instead of a male threaded end for a clevis they have a female thread to screw in a press die. Which is why I had to make my own clevis ends. Sounds like the blades may be work hardening. I guess I'll give it some more time. I split some 8.25" thick by 24" wide granite slabs today. Dramatic is a good word to describe the instant the stone splits! I'll have to get some video too. I do need to modify the table to extended around/past the blade so that the stone doesn't "tip" when position it. Looking forward to any updates you have.
granite - holy cow. Probably at least an order of magnitude harder than what we're splitting here. I doubt our splitter would ever split an 8"x24" granite slab. work-hardening on the blades - yes that might explain it. But if you're doing much granite, you might need to look for some carbide tips or something?
Greg,
splitting granite!! wow! that is many times harder then splitting sandstone, no wonder your blades are losing shape. I have seen German splitters do that but they all use carbide edged blades and carbide is both expensive and brittle. I would assume your split granite is jumping out of the split with considerable force. If so you might want to put some kind of strong fencing out there past the table for safty.
The reason the table on the rockbiter needs to float is to concentrate the forces between the upper and lower blades (teeth). The table is just there to support the stone until the blades get a bite on it and the table itself is independent (as Thomas indicated).
In practice the biter actually has split sandstone quite a bit thicker than 8 inches and up to 20-24 inches wide but with the smaller hydraulics and thinner metal it was not intended or designed to split igneous rock like granite. I was impressed with your work. I always say, "If it works, it is a success." I have gathered (purchased) metal for my own with a few new modifications I want to try and a beefier framework but am still working on getting the hydraulics together. I would like a gas powered stand alone system that can be hauled around on trailer so split rock can be hauled from the manufacturing site to the use site.
Always nice to hear from someone who is willing and able to do it themselves. I would love to see pictures of your finished work if you decide to post them.
By the way the name was from the movie Neverending Story.
J. Gilbert
Hello Mr. Gilbert,
Actually I first tested it out on sandstone and that is where I saw the blade deforming. Most sandstone is higher in quartz than granite which makes it much more abrasive. The granite I'm splitting has 20% quartz where as a Pennsylvania bluestone (a sandstone) has around 50%. Now having said that, I'm not sure which is "harder" to split. All I know is that sandstone is "harder" to saw because of it's abrasiveness. On the table fence, that was going through my mind right after I saw the piece shoot back :)
Just so there is no confusion, my table floats too, but instead of springs I used a hydraulic cylinder to control the table height (gravity down, hydraulic up). I just wanted to say thanks for pointing that out here, as it was a feature of the commercial stone splitters I hadn't noticed. I do need to extend it past the blade though so the stone wont tip when positioning it.
I put some more pictures up in this directory, http://www.carter-engineering.com/images/stonesplitter/ if you look at stonesplitter6 through 9 they show the granite splitting. 6 is taking off just just a few inches, which was nice to see worked. But I think that is more a characteristic of the stone than of the splitter. 8 shows the piece turned 90 degrees after splitting those two large pieces to view the split. 9 shows it hooked up to the dump truck, which has a crane on it, the control valve for it had a spare valve so that is how I'm powering it for now. If you look at stonesplitter3 you can see the original guides and upper blade. I had lined the guides with UHMW plastic strips, but they were only 3/4" wide. This coupled with the "high" blade allowed the blade to twist. I abandoned the use of UHMW for now as it probably isn't necessary in a non production splitter. Plus shortened the upper blades by 3" (had them water jet cut to get a clean cut).
It was Thomas and your work that inspired me to finally tackle this project. It's something I've been daydreaming about for years...
aaaah, so your table does float. One downside of our spring-levitated table is that it is a bit like a cocked gun when the stone splits. Under just the right (wrong?) conditions, as it goes from compressed to uncompressed at the instant the stone splits, it can propel scrap stone and stone tools left laying on the table.
As soon as one gets a stone splitter that splits reliably, one wants for automated stone loaders and handlers. I see you have rollers on yours already... smart. Ours is usually on the back of the tractor, and I can lower the whole deal down with the 3pt. hitch lever, to load the big ones. In fact, I've evolved into the habit of leaving it lowered to the ground, and working the hydraulic control lever with my foot.
Greg, wish you could have seen Mr. G's eyes when I showed him pictures of your rock biter today. I guess that's what mine probably looked like when I saw your pictures yesterday.
Greg,
J.Gilbert here. I have studied the pictures on your site and see that your table is hinged and uses the hydraulic to move up and down but that it ends at the lower teeth. The table on the biter extends to both sides with slots in it for the bottom blades to come up though when the upper blades press down on the rock. They only come up out of the slots in the table a little but it keeps the force focused between the upper and lower biter blades. The table has springs on both sides that it "floats" on. I think that air cushions like on big trucks would work just fine and maybe use some small shocks along the sides to keep the table from "springing" back to quickly once the rock has snapped in two. The upper blades and hydraulics would compress the bags under the table just enough to let the bottom blades come out and do their job. the back end of the rock would lay on the table with the lower blades just holding the rest up a little and all the force then is on the area to be split. That is what I see on the rock biter when it is running. the force would of course be coneing out from the blades at top and bottom like V's with the apex touching and the open ends away from each other. one v would be the blade and the other v the force fanning out through the rock. Probably a very tight v of force or the break would be more un-even than it is . I could draw it better then I can word describe it but that is my concept of how the force is from the opposing blades going through the rock. The second thing I noticed was the ridgidity of the rams and upper blades. As Thomas has said, the rock biter has quite a bit of freedom of movement on the blades themselves which is still in a vertical line but the blades can tilt up or down on either side until the rams equal out then it starts putting on the pressure. Where you have yours fixed by the groove at each side ours goes out and around the side upright and has rollers (greased) that allow it to still move while doing so in a vertical plane. With the flat surface of the rock I seen that is not likely and issue but some of the rock we were breaking did not have two really flat surfaces and we were trying to allow the blade to adjust itself to the topography of the rock we were trying to split and each one would be different maybe 6 inchs on one side and 8 on another side across or have a big ridge down its lenght more to one side then the other. How are the rollers holding up to the pounding? I have seen tables with half inch thick steel that were bellied from the pounding. Awesome amount of metal and looks rugged as all get out. If I can ever get the hydraulics together ( got a pump from a friend) I will be using 1/4 inch metal for mine. economics dictates that as 1/2 is pretty costly.
Just too cool to see someone else "roll their own" on stone splitters.
Quartz sandstone will abrade blades on saws quickly but it is the overall hardness of the rock on splitting that counts, many limestones are a lot harder than sandstones and granite is not called the "rock of ages" for nothing. You might find some metamorphic quartzite that is as hard as granite but not likely to find many sandstones of any type that are (at least in general). On the other hand granite is an igneous rock made up of interlocking grains of crystals and the grains can be pressured apart. There might be some fine grained sandstones cememted together with silica as the binder that are pretty darn tought but if the binder is calcium carbonate like around here they will be a lot softer than granite so if you are getting good splits then you are doing great. Keep us posted.
J. G.
Hello Mr. Gilbert,
I had a setback a few weeks ago and bent my upper blade support. I had planned to extend the table out around the blade (I think I mentioned this in my post Sept 20th). But my employers were in town and I was attempting to give them a demo. Well I was splitting a much shorter stone and it tipped, causing the upper blade to want to follow the surface of the stone. And this time the whole blade support bent. In this picture http://www.carter-engineering.com/images/stonesplitter/twistedbladesupport.JPG it should be lying flat.
I had to break down and ask a mechanical engineer friend of mine for ideas. So now on to version three of the upper blade and guides. The upper blade is sandwiched in-between two 0.25" 4"x2" tubes. My ME friend says this should make it at least 45 times stiffer. The guides now move up/down with the blade, they are the vertical 4"x2" pieces you see. They can pivot where they attach to the horizontal blade, or more precisely the horizontal blade can pivot while the guides remain vertical. The guides now push directly on the I-Beam.
http://www.carter-engineering.com/images/stonesplitter/stonesplitterguidesversion3_3.JPG
http://www.carter-engineering.com/images/stonesplitter/stonesplitterguidesversion3_4.JPG
If I were to do it again I would buy the I-Beam (instead of using what I had) that wasn't as thick and run the guides on the outside, much like yours.
I still need to modify the table so it extends out around the blade. Then I can test it out.
It's funny when I showed my friend pictures of what I had done, and of the bent blade, he immediately guessed that the stone tipped.
So the lessons learned are: 1) A table that extends past the blade is an absolute requirement, and 2) don't try to show off your hot new splitter until you are done building it :)
I need an evening or two to finish up the table then hope to get some video...
Alright, lots of reinforcement later... here is a video (8 megs) http://www.carter-engineering.com/video/stonesplitterworking.mp4 It's mp4 format hopefully you can decode. Haven't tried to put it on youtube yet. I still think I need to reinforce the upper blade support some more. I think I am seeing some flex it in. The video shows splitting the stone in two, me turning it to view the split. Then a "trim" split, just taking off 1" to 2". A still shot of some additional bracing for the bottom blade. Then splitting a similarly sized stone in two, with a still shot of the split.
OK, figured out youtube. Here are two videos. The second one shows the table movement clearly (the night shot). When you see me reach down below the table I am adjusting a needle valve that restricts the fluid flow to the cylinder for the table. I'm trying to find the right setting for slowly lowering the table vs having it rise fast when the blade moves up after the split.
Video 1
Video 2
Nice Greg, very nice. Thanks for putting it up on You-tube. The quality of the splits you are getting is amazing. And your machine makes ours look like junk now!
All we've tried here is siltstone (tons and tons of it) and a piece or two of limestone. Our blades have a lot more slop, which I think is helpful for our uneven rocks. The exception is the slop which permits "overbite and underbite". Normally not a big problem, but makes it hard to split only a couple of inches off of a stone.
what's your next step?
Hi Thomas,
The granite splits very nice, whether by hand, with feather and wedge, or with the splitter. That's part of it. Having the nice flat sawn surface helps a lot too. I also made the lower blade adjustable to help center it under the top blade. That's what the big horizontal bolts you see in this this picture are for. I slotted the holes in the angle iron so that it can be adjusted back and forth. They were out of alignment by about 1/4", I found I had much better luck with them aligned.
I will try it out with some limestone and uneven sandstone I have laying around. Theoretically the top blade can pivot between the two clevises to allow for unevenness. But the divider/combiner valve needs to allow bypassing for this. In theory the one I'm using should not allow for this. But in practice it does. I've seen the cylinders get out of sync. I just dead end them and that brings them back together. You can get more expensive divider/combiner valves that have built in adjustable cross over relief, but I'll see how it works with the cheap one.
My plan (more of a day dream :) ), is to build my garage out of stone. The granite is just for the "trim", around the doors/windows/garage doors. It will be 26'x50' (foundation is already in), with 16" solid stone walls. I'll use a different type of stone for the walls, to get some contrast with the granite. The roof will be gambrel style, so it looks like an old barn.
I finally started on trimming up the pieces that went through the splitter. I use a pitching tool (I'm guessing you are familiar with these now after doing all your stone work), to put a "bubble" or "rock face" on the front of the stone. Here are a few pictures of a "finished" stone. These are for the stone labeled "U" in this drawing:
Door CAD Drawing
Finished Stone 1
Finished Stone 2
Kind of hard to tell in the photos, but the "bubble" sticks out about 2". You can see the foundation there in the background of the second picture, to the left of the wheelbarrow.
Anyway.. so my plan now is to get as much split/finished before winter sets in. Then next spring start actually putting some rock down.
Greg,
Awesome!!! I love it! Good old fashioned ingenuity at work. Thomas is still using the old rock biter but mostly we were concerned with the relatively soft (compared to what you are using) sandstone of fine grained sandstone with calcium carbonate binding. Much softer and especially so if it is fresh, unseasoned rock. As you can see from his blog, they are living in the house now and it is a gorgeous place. Has a German flavor to it with the beams, slate roof, eyebrow windows and exposed beams.
Thanks for sharing your experience. I am still looking to start work on mine when I can get all the materials together and the time to work on it for 6-8 weeks. I want to make mine so I can just haul it out to where ever and use it.
JHG
JHG,
Yes Thomas's house is an inspiration for sure. I think I may end up using sandstone for most of the wall stone. We'll see though. I'm sure you've seen some of the commercial Portable splitters. If you have pallet forks for your tractor you could use some 8"x3" rectangular steel tube for the bottom "legs", then lift and it using the forks (instead of wheels). That's what I did. I've organized my construction photos and added some comments: http://www.carter-engineering.com/stonesplitter.htm
The snow has melted so I hope to take it apart and paint it then start using it again soon. Good luck with yours and keep me updated!
Post a Comment
<< Home