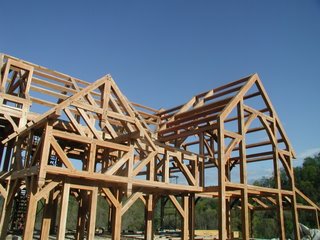
Valley purlins set (and they fit!)
 After grinding my timberframe project to a stand-still a few months ago when I struggled with the hip rafters (and their associated "compound mortise and tenons"), I was very leery of introducing any more complicated compound joinery in to my timber frame. So, when it came time to do the valleys on my house, I wanted to K.I.S.S. I didn't want to completely cop-out and use stick framing for the valleys (not that I'd be any better at that, but I'm told it's easier). One reason not to use stick framing is that I have a loft on the 3rd floor that has an open view into the great room. I wanted the look and feel of the ceiling in the vicinity of this loft to match the rest of the house.
What I started with was similar to the stick-frame approach to valleys. In stick framing, they sometimes just build the entire roof of one house and then rest the intersecting roof on this built roof. I framed the main roof (with common purlins) just as if it had no intersecting roof. I ommitted the typical valley rafter. Then when it came time to connect the intersecting roof, I just had the purlins from the intersecting roof simply meet and rest upon the purlins of the main roof. Assuming both of your roofs have the same pitch, you can find the angles for cutting the ends of these intersecting purlins on your speed-square.
 Confident that this approach was simple and efficient, I added just one more level of complexity to the design. Where the loft overlooks the great room, I would have been looking through two purlins of the main roof if I had kept everything this simple. So, I decided to angle one of the purlins in the main roof... making it kind of like a valley rafter. (when you tilt a purlin more than 45 degrees, is it still a purlin, or is it a rafter?!) Then one of the other purlins of the main roof and one of the purlins from the intersecting roof could rest on this "quasi-valley-rafter", and leave the view from the 3rd floor loft unobstructed. That was the final solution. The design was pretty simple, but I know my description is confusing, so please ignore what I just wrote and look at the pictures - they make a lot more sense! :)
Other notable things in these pictures - you can see where we've framed for the chimney to exit the roof, and we haven't yet placed all of the ridge beams in these pictures. I actually ran out of timbers, so we had to go into the woods and find some more downed trees to fabricate the ridge beams out of. We ended up using white oak, because most other trees that came down in the ice storm are now too rotten. :(


0 Comments:
Post a Comment
<< Home