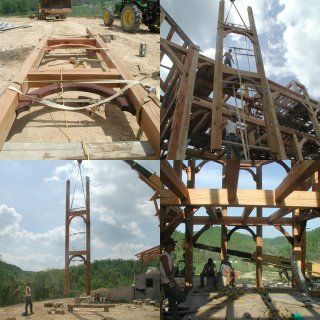
Tower front goes on

Yesterday we put the front of the tower on to the house frame. It went pretty smoothly, and the custom braces we made for the tower fit better than I expected they would. The picture to the left was taken from the crane bucket, after we pegged the tower posts. From this angle, you can see the oak 3x3's (12" o.c.) that we've been putting down for a sub floor (instead of plywood).
 As it turns out, I had made a significant design error in the long posts that I didn't discover until yesterday. I might have tried to blame the mistake on someone else (who laid out this beam!? who cut these mortises?!), but when you've got the same mistake replicated 4 times on two different posts, it's pretty clear that cut-copy-paste was involved in that kind of mistake! (to err is human, to really screw things up takes a computer). The angled girts that connect the posts to the main house are 8x8's with 2x8 tenons. But the mortises in the tower posts were 2x10. No issues, we just manufacturered some "faux splines" on site and put them in the bottom of the mortises... you can see them clearly to the right and left of the braces in the close up photograph of the braces. Everyone agreed with me (under duress of thirst and with the prospect of cold beverages on the horizon), that these faux splines looked great, and surely if we do another tower, we'll incorporate the same mistake as a design element.
 The two very long posts were bowed considerably (at least an inch each), but they straightened out when we pulled them to each other and then tight to the main frame. We used a 2x4 to spread the feet of the posts so they would line up with the mortises in the sill when we flew the assembly to the mortises. After the post tenons dropped into the mortises, I just kicked the 2x4 spreader out on to the ground and the post feet stayed right where they belonged. You can see the raising sequence to the left. A friend arrived just in time with a small cooler full of ice and aluminum cans.


0 Comments:
Post a Comment
<< Home