
Building SIP walls on the ground
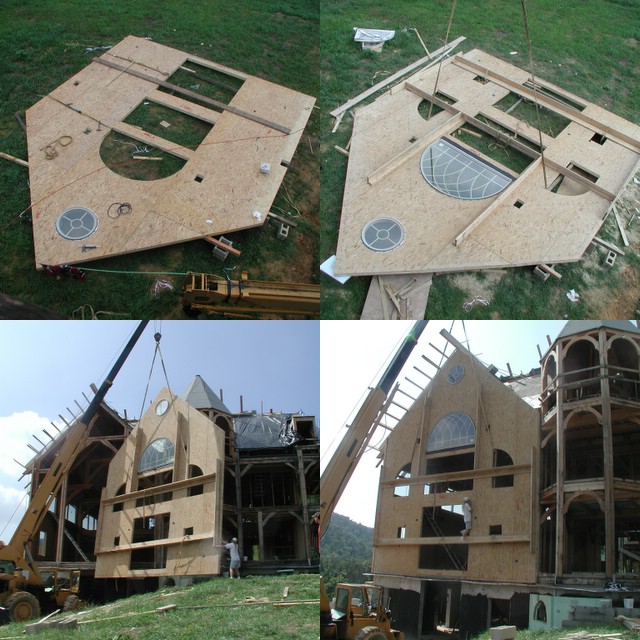 The SIP panels that I ordered are kind of like a giant puzzle. Because they are joined by tongue-and-groove seams, there is occasionally a "preordained" sequence that must be followed in order to assemble the panels. And sometimes, this means trying to fit small panels on top of large panels 30+ feet in the air. Getting everything square and aligned with the timber frame and then inserting windows into the walls (at this elevation) can be quite difficult. Searching for a simpler (and safer) way to accomplish this, I decided to assemble ten of the panels together on the ground and fly them together all at once. In fact, we prehung the two most difficult windows in the assembly before flying it on to the timber frame. The photo-collage shows the sequence of events.
To keep things from bowing when the crane lifted the whole shebang, we made "walers" and "stiffbacks" out of 2x10s and secured them to the panels, . We first did a test lift with only the small window in place. After observing that the assembled bowed very little during the test lift, I decided to place the large semi-circular window into the assebmly as well. I would guess the semicircular window (8 feet by 5 feet) weighs over 250 lbs (it is difficult for 3 men to handle on solid ground), and putting it into place after the wall was lifted would have been no fun. To lessen the risk of cracking the large window during the lift, we only partially drove the nails that hold the window's nailing fin to the wall. This gave a little bit of play between the very rigid glass and the semi-rigid panels. It was a risk-vs-reward decision and the risk paid off for us.
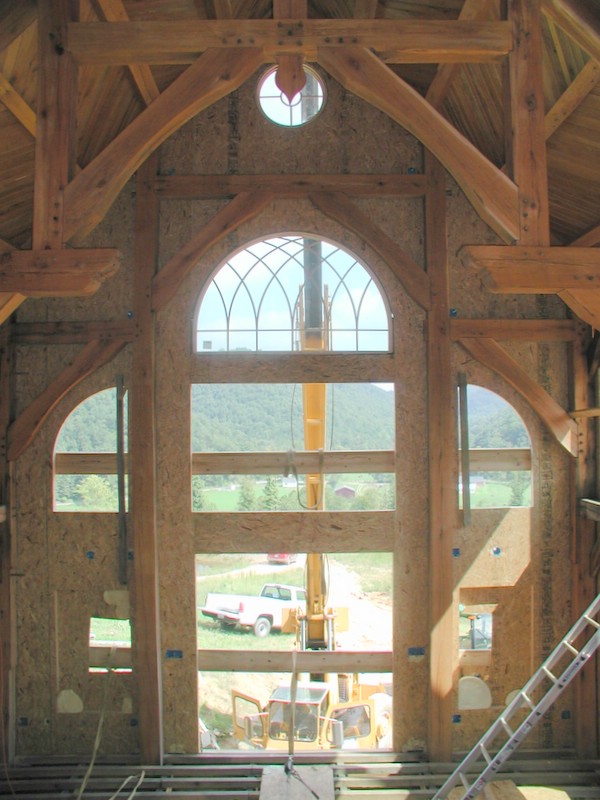 As soon as we had the giant wall in place next to the timberframe, we quickly drove several of the panel screws into the frame, and then removed the crane rigging. This picture shows this interior wall of the timberframe and how its braces align with the windows. My wife and I morphed this design from several pictures we saw in magazines. We spent hours iterating between commercial window offerings and possible brace locations and radii. We are really pleased with how it turned out.
By the way, my wife selected all of the windows for our house, and ended up ordering about 70% Jeld-Wen brand windows and 30% Andersen brand windows. The styles are very similar, so if you pay attention, you can use the two brands together in the same room. The decision to use Jeld-Wen windows was largely price-driven, and Andersen windows were used only where Jeld-Wen did not have a viable offering for what we needed. With that said, I can tell you that the Jeld Wen windows appear to us to be of a much higher quality than the Andersen windows, even though the Jeld Wen windows are about 2/3's of the price! One reason the Jeld Wen windows seem so much sturdier could be that they have an aluminum exterior cladding whereas the Andersen windows have vinyl exterior cladding. The aluminum makes the wooden windows stronger, whereas the vinyl cladding more-or-less just protects the wooden windows. Of course the vinyl won't conduct heat as readily as the aluminum, but when you handle and install the aluminum clad windows, they feel like they're in a league above the vinyl clad windows. I should also mention that the aluminum nailing fin on the Jeld Wen windows lays a lot flatter on the exterior wall after being nailed. I will admit that I was a skeptic when my wife suggested buying "Jeld Wen" windows, whose name I couldn't even pronounce, but now I must concede that she really did her research.
posted by Thomas Massie at September 16, 2006
![]()
2 Comments:
Thomas,
Your home is looking AMAZING!! I am so jealous!
Question: on July 25 you wrote that you would give your opinion on the best way to enclose a timberframe home after you received your SIPS. I am wondering because we are currently thinking of going with SIPS for enclosing the roof and stick-built for the rest of our home. (Because of cost, and if it goes "blazingly" fast, that is great too) So. . . opinion please-
Amy
Wisconsin
Amy,
I still have mixed feelings about SIPs. They are working pretty well for the walls, and we can tell during the construction that they will be incredibly energy efficient. As for the roof, one thing to think about is: if you use SIPs for the roof, and the roof leaks, how will you ever know it is leaking? What happens if it leaks enough to damage the OSB bonded to the SIPs? When re-shingling conventional houses (replacing the asphalt shingles), it is not uncommon to have to replace a piece or two of plywood here and there, where a minor, unnoticed leak has ruined the plywood. I'm not sure how you would deal with this if your OSB or plywood were bonded to the insulation, and being depended on to support the roof (as would be the case with SIPs under a roof). There are ways to mitigate this concern - for instance, you could roof over SIPs with standing seam metal, which seems to be the most goof-proof, leak-proof method of roofing that I have found. Standing seam roofing is not to be confused with the metal roofs becoming popular today which have rubber-gasketed screws going through the roof. (I wouldn't trust those over SIPs either). Standing seam metal probably won't outlast slate, but it takes less skill to install, flash, and debug.
Of course, if you want a house that has cathedral ceilings, the problem of building a roof with detectable leaks is a problem whether you use SIPs or not. For instance, I have cathedral ceilings in this house that I'm building, and although I did not use SIPs, I still have the problem of detecting leaks when and if they should occur in my lifetime. But I don't depend on OSB or plywood to provide structural support in my roof system. When I do find the leak, it probably won't be too late to fix easily.
Another thought is to use vaulted ceilings instead of cathedral ceilings. Not sure I'm using the terminology correctly, but what I mean is you could leave a large airspace between your ceilings and your actual roof. We had a house in New Hampshire that was built this way. I never crawled into the space between the roof and the ceiling, but it was there and now I understand why. Not sure how SIPs would fit into that scheme... they probably don't.
So, there's your inconclusive answer. :) Be sure to talk to some seasoned roofers for their opinions.... 60+ years old? Old enough to have been able to replace the same roof twice. :)
Post a Comment
<< Home