
Eyebrow dormer - 5 courses complete and picking up steam!
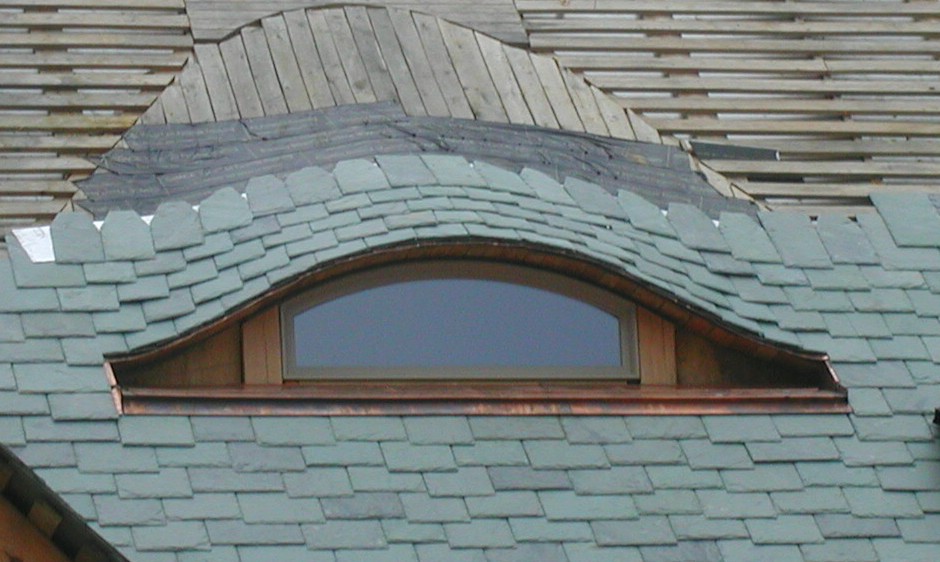
 It took me half of today to lay two courses of slate across the eyebrow dormer. (plus about 20 field slates next to the eyebrow) It's taking shape, looking reptilian, and I love it. Each course across the eyebrow has fewer and fewer slates, so it will go quicker and quicker as I progress. It's very exciting to build this part of the roof because I've never seen an eyebrow dormer in real life. After I finish each course of slate, I scramble to the ground and try to imagine what it will look like when I'm done.
The first picture was taken leaning out one of the regular (aka doghouse) dormers of the house. There's usually a helper (a college student studying carpentry) inside the doghouse dormer who cuts the slates to order and hands them out to me. I trim the tops of the slate (with a board and slate hammer) to get them to lay just right, punch the nail holes, and nail them to the roof. I use a rope around my waist and stand on the copper shelf in front of the dormer in order to lay these slates. After I finish about one more course, I'll have to position myself above or beside the dormer in order to nail the remaining courses.
The 8" slates lay flatter on the convex portion of the dormer than they do on the concave portions, even though the rate of curvature is the same. You can probably see why just by looking at the second picture. If I had it to do over, maybe I
 would use 6" slates in the convex areas, but I'm satisfied enough not to tear off the slates and start over! I'm axious to see if I can get the eyebrow slate courses to run perfectly horizontal (i.e. perfectly in line with the field slates) just before I reach the peak of roof and run out of room. Tomorrow I'll recheck my math before adding anymore slates.
BTW, with the prospect of winter setting in on a house without a roof, I've recruited some more part time help. While I'm slating on this side of the roof, there's a crew of "the regular band of in-laws and out-laws" on the other side of the roof, installing polyiso insulation and oak nailers so we can eventually (soon?!) lay slate over there too!
posted by Thomas Massie at Thursday, October 12, 2006
![]()

2 Comments:
Looking like a masterpiece Thomas. What dimensions did you lay your battens (open wood sheathing) at? What are the dimensions of your slate? How much headlap are you using? So many questions, such cool work!
Thanks JM and Shawn. Battens are white oak (and some red oak) 1x4's, spaced 7.5" from the bottom of one board to the bottom of the next board. eaves and peaks are sheeted solid for 12". The widths are actually anywhere from 3.5 to 4 inches - some were ripped on my sawmill, and some I ripped on my old edger, which has a setting that will take a 12" board and rip three boards, each 3.75" wide - at once! I am using a dewalt planer to plane them all to 1" thick. The dewalt planer is not really made for this kind of service (dried white oak!), I'm on the 6th set of blades, and the planer is really pretty slow and keeps blowing its own circuit breaker.
slates are from Camara Slate. 18" and 20" long, (widths vary from 9" to 14" and thickness varies from 3/16 to 3/8). I lay everything out for 18" slates and just treat the 20" slates as oversized 18" slates. I hold the top of the 20" slates 1/2" above the top of the 18" slates, so the butts of the slates are staggered 1.5", more or less. Exposure is nominally 7.5" and headlap is 3". If an 20" slate is in the course directly above an 18" slate, then the exposure looks like only 6". If the opposite is true, then the exposure looks like 9". Really though, the exposure is 7.5". The lowest 4 or 5 courses have 7" exposure to get everythign to work out nicely at the peak. Books suggest 3" sidelap (min.), so I try to keep the sidelap at 4", but sometimes I will allow 3".
Post a Comment
<< Home