
Pouring the basement slab
 With our footer done, our walls poured, our french drain laid (inside and outside of the footer), and our gravel base for the slab compacted, it was time to move on to the floor for the basement. Dump some concrete in there and smooth it out - right? Not exactly! There are as many versions of "the best way to pour a slab" as there are books and blogs on "how to pour a slab." As with everything else for this house, I tried to survey as many sources as possible and see which made the most sense to me. I still don't know the best way to do it, but I'll describe how we did it!
First we laid a layer of plastic sheeting down on top of the compacted gravel. The books say that this is to keep moisture from wicking up through your concrete slab - and I believe it works. In the mornings, you could find beads of condensation everywhere beneath the plastic, but nothing on top of the plastic. Some recommend the plastic to prevent radon migration as well, but I'm doubtful about how effective that could be for us. In spite of my constant patroling and policing, the plastic got several unavoidable holes punched in it here and there - and how would you ever get a completely airtight seal at the perimeter? The accidental holes in the plastic actually helped to drain rain water from the surface, and didn't seem to significantly affect the plastic's ability to keep ground moisture beneath it. My opinion: use plastic, it doesn't cost much, but don't get up tight about any breaches in the plastic - unless you're trying to build a smimming pool... or a basement below the water table... in which case you probably are building a swimiing pool!.
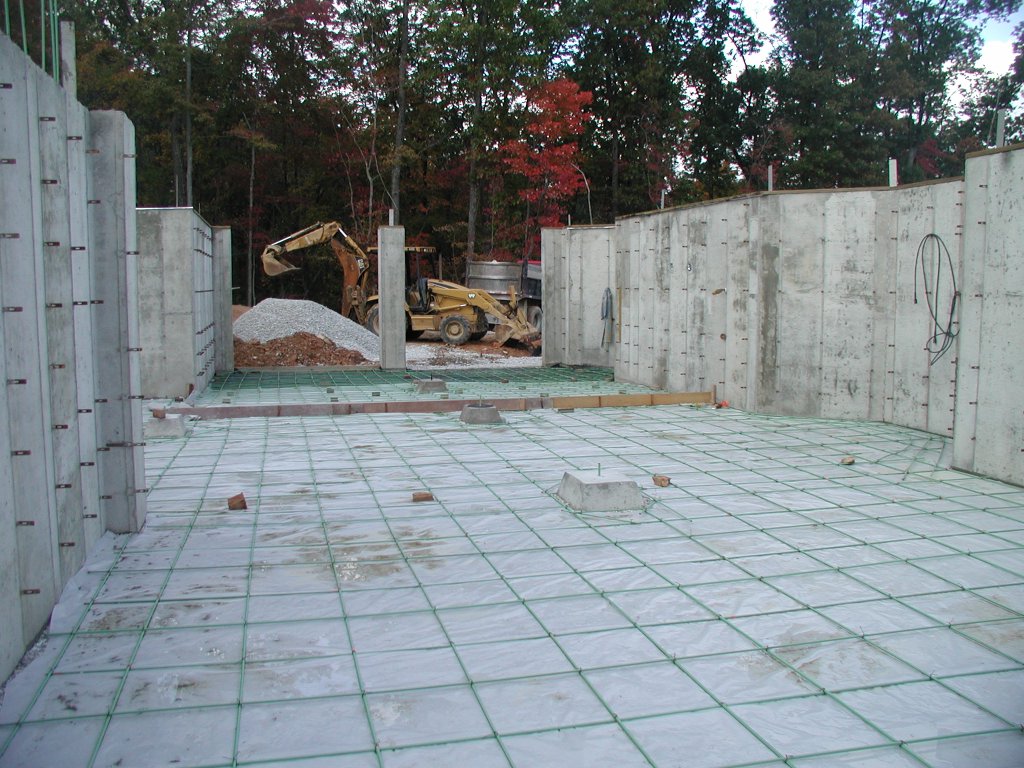
We used a single mat of #3 (3/8's inch) rebar on 18" centers to reinforce the concrete in most of our basement slab. Some folks just use wire mesh, and I think this would work fine too. But I don't understand why folks would pour any kind of permanent concrete without including metal in it. Where our basement forms the garage and will have cars on top of it, we used #4 rebar (4/8's inch) on 12" centers. The slab was poured 6" thick everywhere, and we used concrete bricks, aka dobies (sounds like "dough-bees", not "dew-bees"!!), to suspend the rebar above the platic sheeting. Around the perimeter of the slab, we placed 1/2" by 6" open cell foam padding as an expansion joint. At first I was going to forgo the expansion joint, but then realized that because our basement slab has radiant heat, it could actually expand and shove outward on the base of the basement walls. This 1/2x6 foam strip is perforated on the top, so that after your constrcution is complete, you can rip off the top 3/4" of the foam strip, and fill this gap with airtight/watertight caulking. Brilliant product if you ask me - I had read of it on the internet, but was surprised to fin d that our local building supply store stocked it. We used liquid nails to glue it to the basement walls until the slab was poured.
 Unlike stick built homes, timber frame homes exert downward pressure in a very few specific points on the foundation... at the bottoms of the posts! You would therefore not want to rest your basement posts directly on the thin basement slab. Using the pictures in Benson's book (see book review) on finishing timberframes as a guide, I poured concrete "plinths" (in the pictures, they look like pyramids with the tops cut off) directly on the footer. These plinths are tall enough that when we poured the basement slab, they protruded through the top of the slab by about 2". The timbers can therefore rest on these plinths and transfer their loads directly to the footer without stressing the slab. The one in this picture was poured with quickrete - I wouldn't advise that - instead have some forms made up and pour plinths (precast!) whenever you have extra concrete - that's what we eventually learned to do. (Also note in this picture we have included a few diagonal pieces of rebar wherever the slab forms an internal corner, as this is a n area of concentrated stress and is likely to develop a crack in time. I think this is good practice around window and door openings formed in concrete as well.)
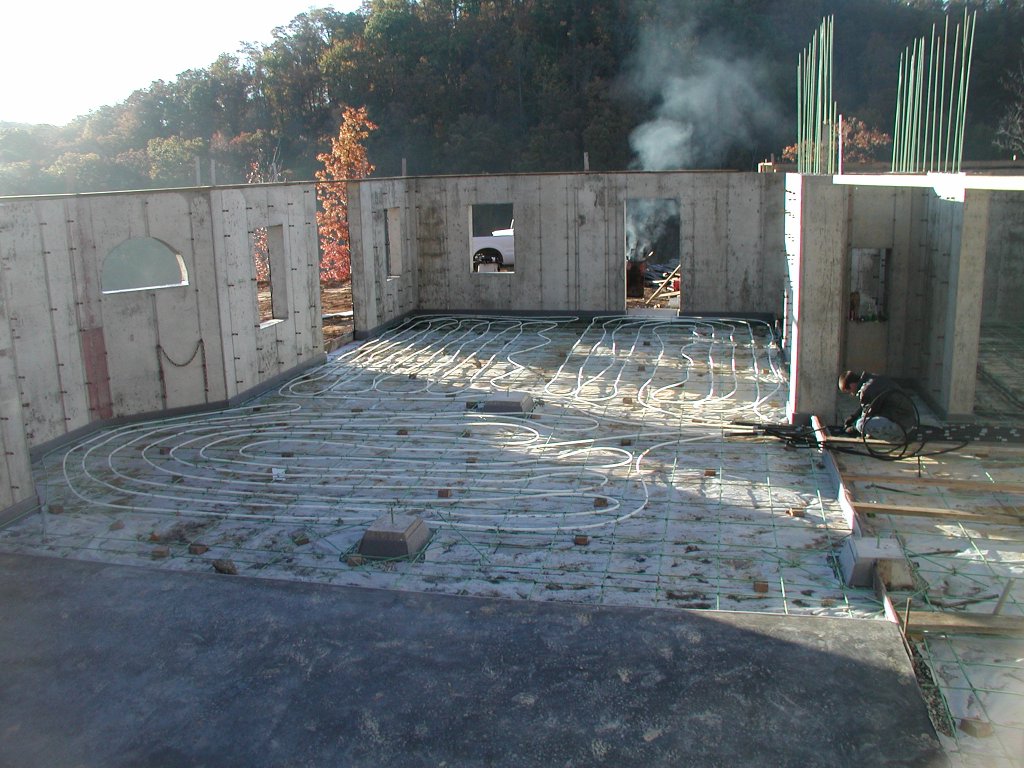 This picture was taken the morning that we poured the second of three sections of our basement slab. We poured the basement slab in three different pours... for a couple of reasons. The most important reason to pour in 3 sections was that the basement slab was 2200 square feet - that's a lot of concrete to lay down at once when you're going to try and finish it with a small crew. Imagine the dispatcher telling you "I'm bringing 160,000 pounds of two part epoxy to your house this morning... and oh by the way, we'll have the hardener mixed in before we get to your site." Concrete will get hard - sometimes quicker than you'd like, and once it's hard, it's there to stay. So we decided not to try and bite off more than we could chew. The second reason to pour in seperate pours was that our garage slab (the section shown as complete in this picture) was unique from the rest of the basement slab in two ways - it had no radiant heat tubing within it, and it had 4" of drop in 24 feet. Having a sloped garage slab is the building code in some areas - but for us it was just plain common sense. Do you want whatever might leak from your car (snow, gas, antifreeze) pooling up inside your home?
 The radiant heat tubing options out there are mind boggling, and once you've poured your concrete, there's no changing your mind. So it took me a long time to actually decide what type/brand/size tubing to use. I eventually settled on 5/8" "Wirsbo" brand radiant heat tubing. (w/ oxygen barrier, but non-potable) They are not the cheapest, but they have been in the field for a long time, and a friend was able to show us his Wirsbo installation. Fortunately, actually installing the tubing took much less time than deciding what tubing to use! For the "finished" section of our basement, we used 3 runs, 250 feet each, and ran it back to the manifold in this picture. Although these loops are not on seperate zones, I could add that option at a later date. The main reason to use multiple loops to heat a large area is that your water will be too cold before it completes the loop if the loop is longer than 300 feet. I plan to use an outside wood furnace, and here you can see that I have already incorporate the 4" hole in my basement wall that the hot water will pass through.
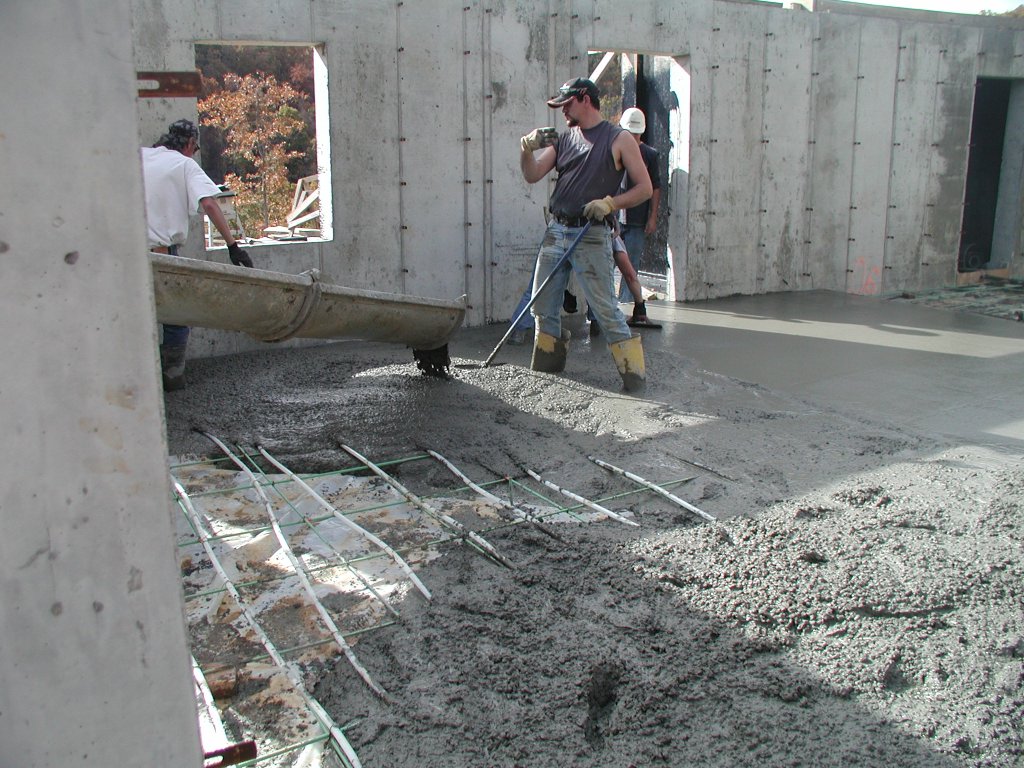 Reaching all areas of the basement slab with wet concrete was not easy. For the more remote areas, we used the crane (the good ol' Grove!) with a concrete bucket, but that was a bit slow. Where window and door openings in the walk-in portion of the basement allowed, we poured the concrete directly from the truck, as shown in this picture. To make things a little easier, we wanted to pour the concrete a little wetter than the previous day. There was some confusion translating this to the concrete truck driver, and we got more water than we bargained for. (but not enough to comprimise the strength of the final slab) It was impossible to see the radiant tubing beneath the wet concrete, but walking on it a little bit did not hurt it. The lines were pressurized (to 50psi) with air while we poured the concrete, so we could locate any leaks if they occurred. Fortunately none of the lines leaked and several months later, the lines still have the same air pressure (adjusted for temperature)!
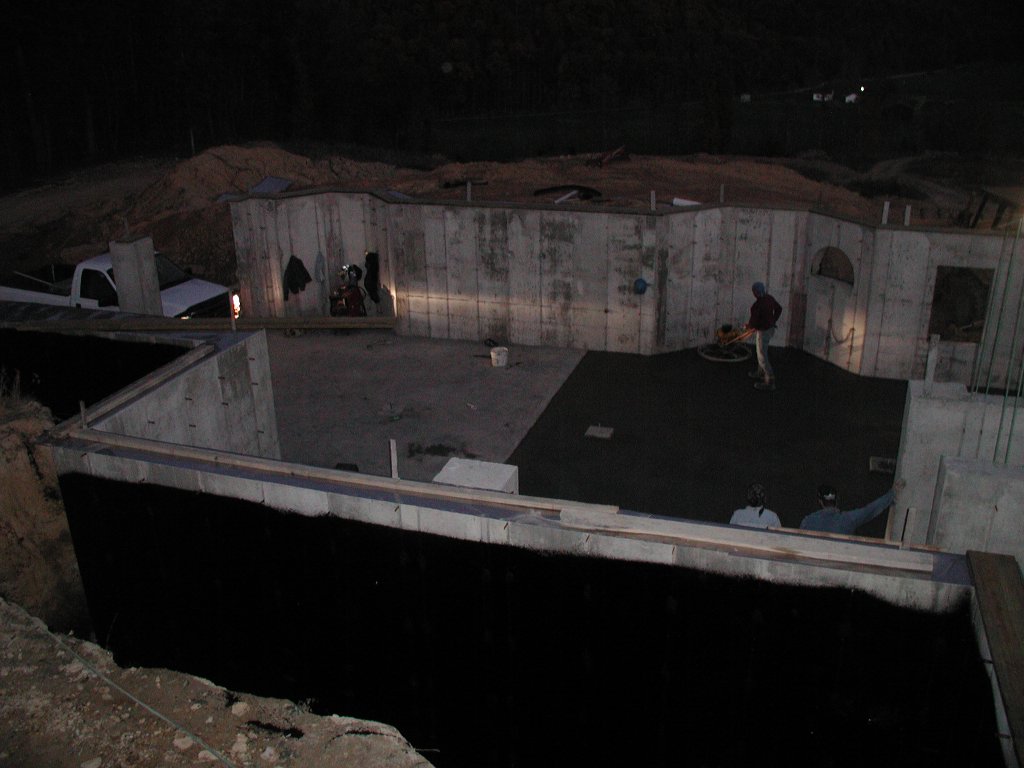 We paid dearly for pouring the concrete a little wet. The concrete trucks had been late, it didn't get very warm that fall day, the south wall cast long shadows on our slab, and experienced concrete peole will tell you that the plastic under the slab slows down curing. Result... we were finishing this slab late into the night, using truck lights as our guide. All of our help left, but my brother in law (who is a concrete expert) stuck around long after any normal concrete contractor would have said "well that's the slab you're going to get". Good thing we started early that morning as my brother-in-law had suggested.
 The slab turned out great though. It is glass smooth. In this picture you can see that I have saturated it with water (24 hours later) to make it cure more slowly - thereby imparting more strength to the slab (or so they say). We plan to stain and score the slab and use it for the actual finished floor. In the background of this picture you can see my welder, ready to tackle the stainless steel termite flashing, since that's now all that stands between us and raising some timbers!
posted by Thomas Massie at Saturday, September 17, 2005
1 comments
![]()
