Wednesday, November 22, 2006

Copper flashing for south dormer

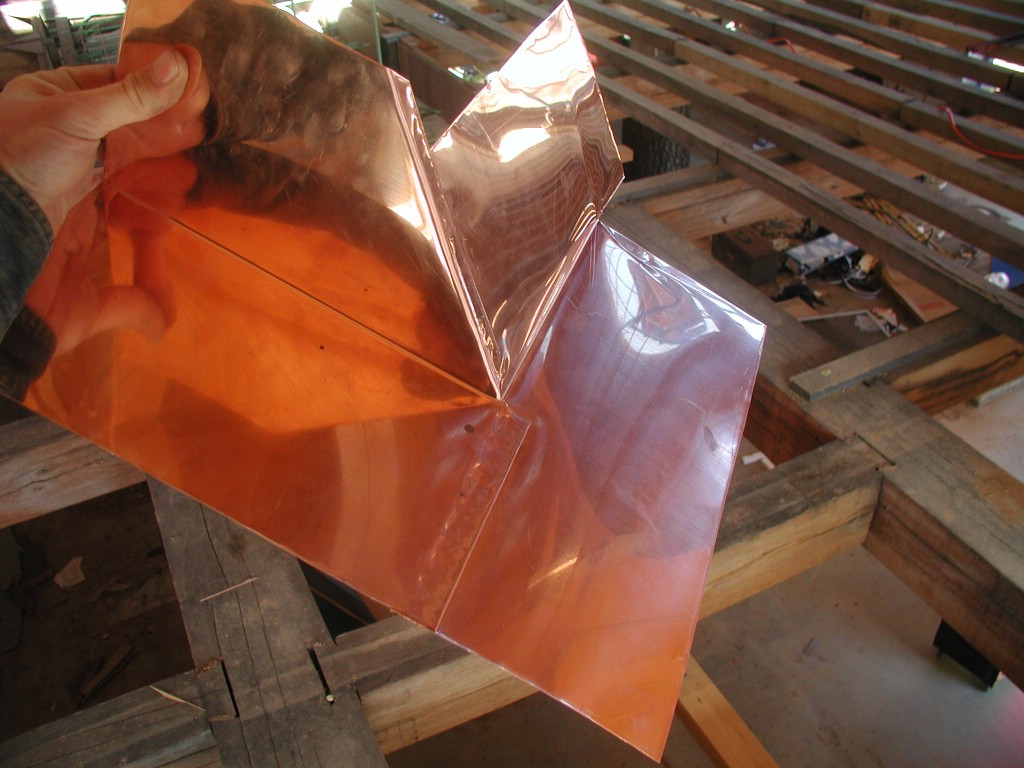
There were four of us working on the house today. I worked on several pieces of flashing, while the other three started wiring (more on that later!) the house. I'm finally starting to learn how to do this flashing thing... I think. The trick, I was recently told by an expert roofer, is to fold and crimp two pieces of copper together before you try to solder them. The resulting solder joint will be much stronger. The picture to the left shows a piece of flashing that I fabricated today. Even though the joints are not yet soldered in this picture, you would not, using your bare hands, be able to seperate the pieces of copper that make up this flashing. That's because the seams are folded and pounded flat with a hammer. This makes a very strong joint. More importantly, it keeps the pieces from falling apart while you're trying to solder them.

This next picture shows my ultra-sophisticated soldering iron. Maybe you've seen one of these in an antique shop. I think I used to have one laying in a barn here on my farm - but I never took it seriously as a means for soldering anything. (The college student that occasionally helps out says his mom uses one of these to plant flower bulbs!) Before turning to this crusty technology, I tried an electric soldering iron, a butane powered soldering iron, and a propane torch - none of which were adequate for the job. Credit card in hand, I stared down a $400 soldering outfit on the internet, but decided that was too pricey (for something I hope I'll never have to do again!). I bought this iron new (yes, they still make them in Germany!) for $20. The propane tank is from my barbeque grill, and the burner is from an outdoor deep fryer. You put the iron in the fire until it gets hot, then you pull it out and solder with it until it gets too cool. It's that simple, and it works great. Contrary to what I've been told, I believe that I do not have enough irons in the fire. :) Seriously, I plan to buy (or find?!) another one of these irons so one can be heating while I'm soldering with the other iron.

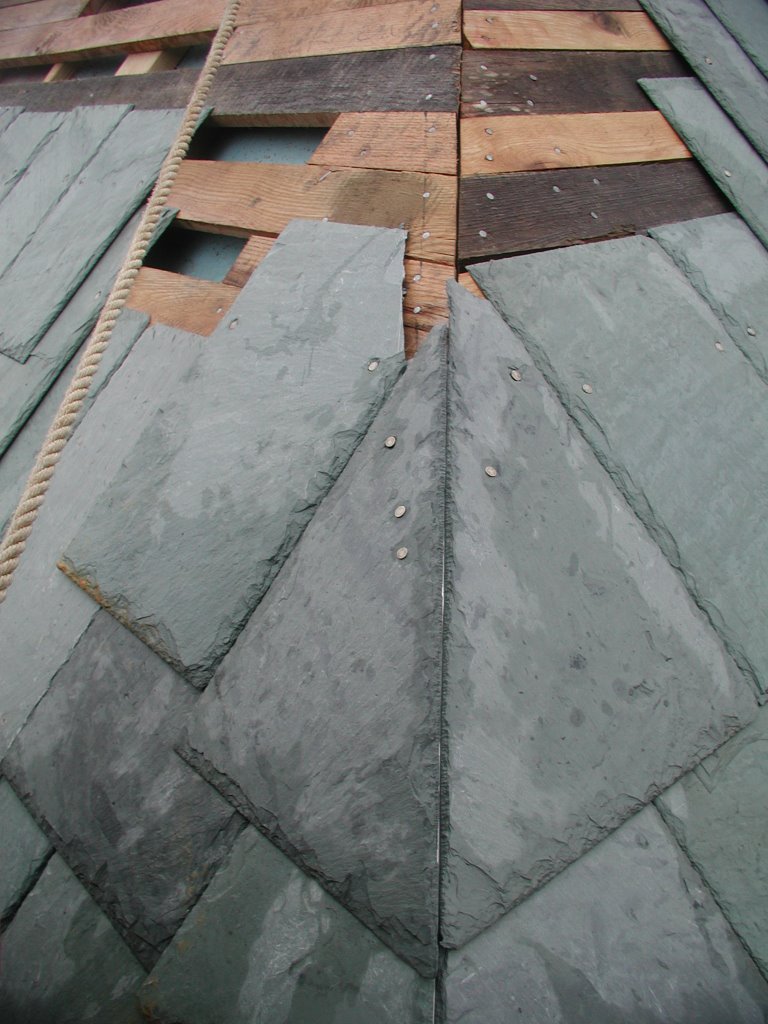
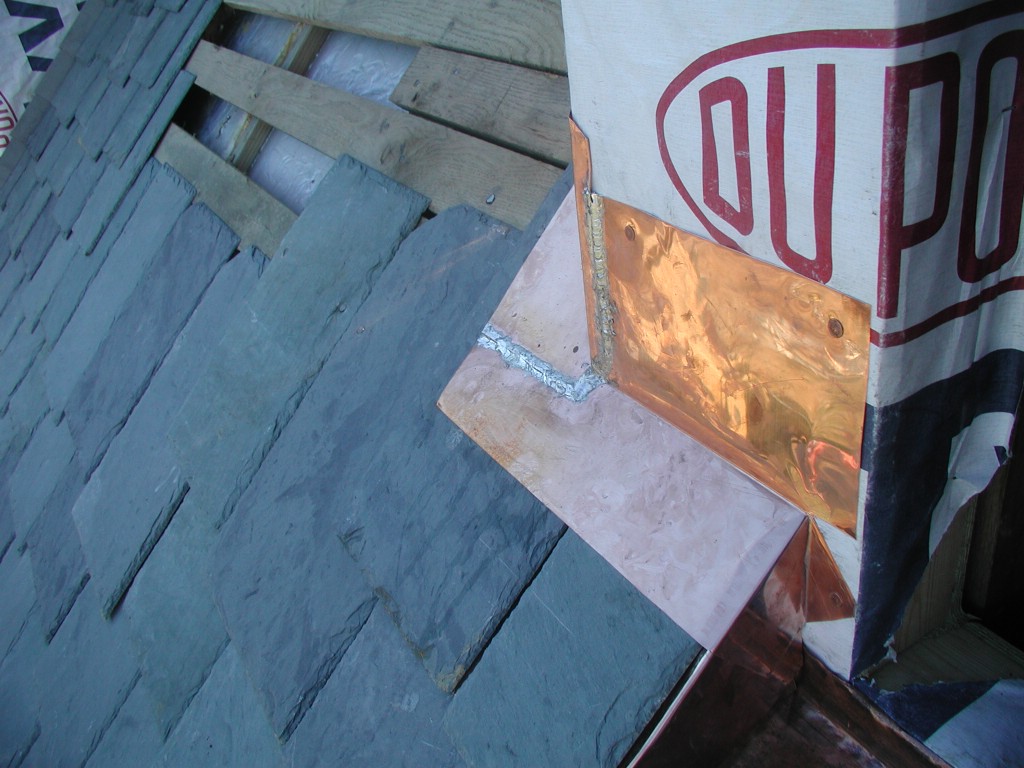
The steps in soldering are (sorry, very briefly!): apply flux to copper, "tin" your copper joint with a thin coat of solder, apply enough heat and solder until solder "sweats" into the joint, "stitch" a bead of solder across the joint, wash flush from copper with water and baking soda. Seems to be working for me - but if anyone has any more suggestions or tips, please comment! Here's the finished piece, nailed with copper nails to the house. Sadly, the next course of slate, and the siding for the house will cover up 80% of this piece of copper. Hopefully it will shed water though for as long as I'm alive.

Monday, November 20, 2006

Our home's power station has arrived!

One of our goals in life is to be as self-sufficient as possible. Long before we decided that our house would be a timberframe, we decided that it would be an off-grid home. In other words, we do not intend to connect our house to public utilities. Our house will be powered by solar electricity. I think we can do this, but my wife remains a healthy skeptic. (maybe I shouldn't have spent so much time on the calculator when she asked if solar panels would be able to provide enough energy for air conditioning)

This is a picture of what I call our home's power station. We ordered it from Nathan (he's "good people"!) at Affordable-Solar. This power station takes DC electricity from solar panels (they will sit atop our roof - sorry no pictures of those yet!), charges a 48 volt DC battery bank, and converts that DC power to 120/240 V AC power for use by normal household appliances (I'll let you know if it'll run my MIG welder, because you can bet I"m gonna try it!). From right to left: The two tall rectangles on the right are called Max Power Point Trackers, and they will take power from the solar cells and charge our batteries. The biggest green rectangle houses all of the DC circuit breakers and connections. The two short&wide black rectangles are inverters that convert DC electricity to AC electricty. (there is room for two more inverters above them - I plan to expand soon!) And finally, the green rectangle on the left houses the AC circuit breakers and connections. The output of this panel will feed into a regular "gray" household breaker box. All of the components in this system were manufactured by a company called Outback and then integrated by contract engineers working for Affordable Solar. The Outback manuals are well written and the components seem to be extremely well made. Feels good to buy something made in the USA that creates clean energy.

Here is a picture of the Rolls-Surette battery bank. There are 12 lead acid batteries, each of which produces 4 volts of electricity, giving us a total of 48 volts DC. (and 1000 Amp hours, for 48,000 Watt-Hours of energy storage). Whereas the solar panels are waranteed for 25 years and are expected to last much longer, these batteries (the best you can buy I am told) are warranteed for only 10 years, and aren't expected to last much longer. Batteries are the weakest link in an off grid home power system... or in an electric car, or in a hybrid car, or, well, you name it... battery technology is stuck 100 years in the past! My strategy was to somewhat undersize our battery system (it could provide for 2 or 3 days of bad weather at most), plan on having a backup generator, and hope that battery technology improves by the time these need replaced. BTW, after waving the American flag for Outback, I should admit that these admirable batteries were made in Canada.

Thursday, November 09, 2006

Some pics of SIPs from the inside

We've been working on the roof, and nothing else, for quite some time. But instead of posting more roof pictures, I climbed off the roof, inside the house, and snapped a picture of some of the work that we completed a few weeks ago. This is a picture of the arched windows inside of what will be our dining room. I framed one of the windows within of a pair of walnut timber frame braces. To get the windows and braces to line up took a lot of planning (and shopping for windows). There was enough play in the rough opening of the SIPs (+- 1/2") to get the window exactly centered within the braces.

I can't wait to cover up that OSB with white drywall, but first we have to get the darn roof finished. If you look at the top of the photograph, you will see some mildew on one of the timbers, because water has been entering the timber frame for 10 months now! A mixture of 50% bleach and 50% water cleans this mildew off without any scrubbing (although scrubbing helps). A good rinse of water, and then a coat of raw linseed oil brings the color right back. Of course, we'll have to undertake all of this "timber refreshing" before the drywall is hung.

Here's a picture of the "tower room," located two floors above the dining room. The two 5 sided white oak posts that frame two corners of this room are the same posts that you see in the dining room photograph... they're 26+ feet long. We used "Great Stuff for windows and doors" to insulate the cracks between the windows and the SIPs. This room is 8 sided, and I included a pair of braces in every wall of this room. All three of the windows in this room are therefore framed by braces. (yeah, I got lazy down in the dining room... and only included one pair of these neat braces, but it just didn't work out nicely down there... the braces wanted to be in-line with the main house frame, not the 45 degree walls.) In this picture you can also see some of the slate we're starting to stockpile on the third floor. (we eventually bring it out on to the roof). Which brings me to the last photograph...

This room will be my oldest daughter's room, but for now, it is the "central slate depot." In the bottom left of this photograph, beyond the stick framed knee wall partition (in what will be her closet) you can see the pile of broken and cutoff slates, which are a by product of cutting the slate for hips and valleys. (before anyone asks, the makita saw in this picture is for cutting wood - not slate!) These pieces of slate will make a great tile floor in one (or several?!) of our rooms eventually. Whereas my smallest useable roof slate is 8"x18", 6"x6" floor tiles will work just fine, and this pile of broken slates will make a ton (literally, 2000 pounds!!!) of 6"x6" slates.

The ceiling beams to the right and left are actually "collar ties" that connect the timber rafters and forma roof truss. In my design, I ran these collar ties beyond the rafters to serve as the "top plates" of the dormers on the east and west sides of the house. I have seen a lot of commercial timber frames where the dormers are stick framed, but I think it is worth the extra effort to frame the dormers with timbers. The horizontal tongue and groove ceiling that you see is actually the floor of a loft that I created in her room.

Friday, November 03, 2006

Slate, slate and more slate

If it seems that all of my blog entries are about slate right now, that's because that's all we've been doing!!! Here's another picture... Slow going, but I've been able to keep the hips slates running straighter than I expected I could. One trick is to put only one nail in each of the mirrored hip slates, line them up just how you want them to lay, then drive the second nail in each of the two slates.

The skylights made nice portals for passing slate and tools out on to the roof, but now we must travel out one of the dormers (not seen in this picture) and climb over the peak of the roof with our materials.

This morning it was 20 degrees F, and although it was shining all day today, the sun never cast a single ray on the this, the north side of the house! Brrr. Here's a frosty picture reminiscent of the timber frame raising of last winter. Hard to get motivated when your slate hammer is right where you left it the day before, but frozen to the battens. :0

Wednesday, November 01, 2006

Installing and Flashing Slate Hips - up close

There are at least 6 ways to install slate at hip roof junctures. I chose a method called "Mitered" hips because it looks to be the most watertight and most durable. Although there are definitely fancier methods, my wife and I found the aesthetics of this method to be "agreeable." (See the slate books for examples of "Boston" or "Fantail"). Until the day I started slating these hips, I was convinced that copper flashing on top of the hips would be the most water tight, but when I got on the roof and started nailing slate (in the rain!) I speculated that water might run along the edges of the slates, under the copper flashing, and into the hip seam, so I chickened out of copper hips at the last minute. In fact, I already had three courses done that way before changing my mind! Back to Mitered hips:

Some things to notice in this first picture...

*the roof is sheeted solid with wood here at the hip by filling in between the skip sheeting. This allows for needed variances in nail placement.

*I cut the corner off of the green rectangular slate to the left of the hip. This allowed me to nail the hip slate of the next course without nailing through (and possibly breaking) this otherwise rectangular slate. BTW, when is it necessary to nail through an underlying slate (and it inevitably is), it's best to drill a hole through that slate rather than trying to nail through it.

*Nail holes in the hip slates are ad hoc, but must remain up stream of the flashing that will cover them. With that in mind, the further apart the nail holes are, the better, as the nails will help keep the hip slate from rotating. Should either the right slate or the left slate rotate, the hip seam will open up and reveal the stainless steel flashing beneath. (yuck) Another way way to prevent this is to make sure that rectangular field slate abutting the hip slate fits tightly against the hip slate.

This second picture shows the stainless flashing that I used. The flashing need not look like this. In fact, normally you would use a square piece of metal, bent from one point to the next point. This was some flashing that I had already made up that was bent down the middle instead of point-to-point. I cut the corners off of it to make it look and function more like point-to-point flashing.

The style of slating on this roof is called "staggered butts, random width" which provides some leeway and simplifies these hip joints. I can have someone precut the hip slates (all the same dimensions) and hand them out to me, then I can vary the width of the adjacent field slate to blend in with the rest of the roof. Also, at the hips, I've chosen to lower the butts of the slates so I can run the flashing a little longer.

"The Slate Book" is full of useful information that helped me through this installation, but they recommend "modified bitumen" as an alternative flashing material (instead of stainless steel or copper). I can see how it would go on easier and lay flatter, but its lifespan (10? 25? 40 years?) seems almost "temporary" compared to the lifespan of slate. The "Slate Roof Bible" recommends more durable flashing, possible because that book's author has replaced flashing on slate roofs that were otherwise in great shape. I want this roof to outlast me, so I'm using stainless.

The third picture looks almost identical to the second picture, but closer examination will reveal that this is the next course of slate and flashing laid upon the previous course of slate and flashing. In fact, if you look at the seem where the two hip slates meet, you can see a difference in how the hip slates come together. In the previous course, I cut the slates from the back side, revealing the textured bevelled edge on the face of the hip slates. In this course, I cut the slates from the front side (one slate book recommends to do this to get a tighter fit.) The book is right, you can get a tighter fit, but I'm not sure i'ts worth the extra trouble. The tips of the slates tend to break off more frequently when you cut them from the front (i.e. cut them with a reverse bevel).

Slating the North Hip Roof... in the rain


Yesterday started out dry, and we were eager to begin slating on the clean palette that we had prepared the day before. Brother-in-law #1 (our defacto crane operator) did not come to work, so I had to run the crane for brother-in-law #2 who laid starter slates at the eaves of the north roof.

Having a crane (aka 1974 antigravity device) is a wonderful asset (did I mention the heater works?!), but running it can be boring at times, so I jumped out of it and cleaned up debris in the yard... throwing some of it into a dumpster, and burning some of it in a barrel. While my brave brother-in-law hung from the end of the crane, I relearned how fun it was to play with fire, and began choreographing my own imagined version of the popular TV show "mythbusters." (see next blog entry!)

After my Bro-in-law finished the starter slates (and the first course of field slates which, as the slate books wisely advise, should go on at the same time as the starter slates), he tied off to the roof and worked the roof from above (standing on the oak battens). I flew the empty crane platform over to the corner of the roof, climbed out on the roof, and jumped on to the platform. From this perch, secured with a rope of course, I was ready to lay (and flash) my first hip slates.

By 2:00 a steady rain set in. I was determined to get as much of the hip done as I could before taking the kids trick-or-treating. Turns out, we had just enough slate laid at the eaves of the house (where I was standing on the crane platform) to collect ample rain to soak me from the shins down within minutes of the rain starting. By 4:00, I was soaked to the bone and went home to take a hot shower in order to get dry again. I took this photgraph from the crane platform as bro-in-law #2 (who had never run the crane before!) swung me away from the house.

Once again, demonstrating the difference in speed between laying field slates and laying slates at roof junctures, my brother-in-law was able to lay over 150 slates while I racked up only two dozen or so at the hip. (Or maybe we just keep demonstrating the gap between his competence and my ineptitude?!)