Here's a quick review of the timberframe books in my library (listed from my most favorite to my least favorite)...
Authors: Ted Benson, James Gruger
Title: Building the Timber Frame House, The Revival of a Forgotten Craft Rating:
 5 out of 5 -
excellentType: How-To (Build it From Scratch)
Summary: This is a great book on how to build a timberframe house. Shows you how to: draw a floor plan, design your (simple) joinery, chose tools, pick timber sizes, raise the frame by crane or by hand. Benson has 3 books that I know of on timberframing - this is his first and is aimed more at the self-builder type than any of the other 3. The illustrations in this one are so good that even if you couldn't read, you could probably figure out how to build a timberframe from the pictures alone. Don't borrow this book... buy it.
Author: Jack Sobon
Title: Build a Classic Timber-Framed House : Planning & Design/Traditional Materials/Affordable MethodsRating: 5 out of 5 -
excellentType: How-To (Build it from Scratch)
Summary: The title, content, and quality of this book is very similar to Ted Benson's book above. However, this book goes further than Benson in one very important regard. Sobon includes a chapter entitled "From Tree to Timber," that you will find invaluable if you're wondering what kinds of trees in your woodlot might be suitable for a timber frame. (You will not find this depth of information on selecting trees in any of Benson's 3 books). Whereas Benson seems to be reinterpreting the craft of timberframing, Sobon more faithfully follows the methods of traditional timber framing. For example, Sobon dedicates several pages of the book to describing the method of hand hewing timbers (sorry, too much work for me, I skipped those pages!). Don't borrow this book... buy it.
Author: Jack Sobon and Roger Schroeder
Title: Timber Frame Construction : All About Post and Beam BuildingRating: 5 out of 5 -
excellentType: How-To (Build it from Scratch)
Summary: If you're wondering what's the difference between this book and Sobon's other book - the answer is not much. They share 99% of the same DNA. They're both great, self contained manuals on how to build a timberframe structure - from the woodlot to completion. Like Sobon's other book, this one includes a chapter on picking your trees. However, this book is centered around building a garden shed, whereas Sobon's other book is centered around building a house. Buy either of Sobon's books (based on whether you want to build a house or a shed) for yourself and skim the other one at the library.
Author: Ted Benson
Title: The Timber-Frame Home : Design Construction FinishingRating: 5 out of 5 -
excellentType: How-To (Be a General Contractor for a Timberframe House)
Summary: This book
won't tell you how to cut joinery, chose your tools, or raise the frame. It will however give you enough information in order for you to chose a timberframe company that can do all of that for you. More importantly, it will show you how to take the frame and turn it into a house. Covers
nearly all of the idiosyncracies of finishing a timberframe home. Great chapters on SIPs (Structural Insulated Panels), foundations, electrical wiring, and plumbing. If you're building a timberframe barn, shed or cabin, you might not need this book. If you're building a timberframe house (or having one built for you), you absolutely need this book. This is required reading for anyone who wants to be or to hire a general contractor for a timberframe house.
Authors: Varied and Many - a Whos' Who (e.g. Benson, Arvin, Levin, Schroeder, Sobon, etc.)
Title: Fine Homebuilding,
Timber-Frame Houses (Great Houses)Rating: 4 out of 5 -
very niceType: Compendium of How-To articles on Building Timberframe Homes
Summary: This book is a collection of 32
Fine Homebuilding articles about timber framing. If you know nothing about timberframing or everything about timberframing, this would be a great book for you to learn more about timberframing! Some of the articles cover aspects of timberframing you will not find anywhere else. For instance, there's an article by Don Price that showed me how to build my basement and foundation so that I could face my timberframe house with real stone. There's also an article by Christopher Hyde that shows the best (only?!) detail on a timberframe
hip roof that I've been able to find in any
book anywhere. I don't know if this book is still in print - I found my copy on ebay. Definitely worth buying no matter what your timberframe angle is.
Authors: Varied and Many
Title: Timberframing Journal on DVD,
Oct. 1985 through December 2004Rating: 4 out of 5 -
very niceType: 2 DVD's not really a book. A collection of everything about Timberframing
Summary: This DVD is not for everyone, but I found it to be a gold mine of timberframing information. No timberframing nerd should be without it. Nearly 20 years worth of articles! Tons of technical information about designing joinery. Analysis of historical structures and joinery. Hammer beam discussions. Destructive testing (stress to failure) of joinery. 20 years worth of entertaining letters-to-the-editor where the leaders and followers of the timberframe revival debated each other about the direction of the guild and the craft itself. I stayed up late for 2 weeks in a row reading this compilation when it arrived in the mail. If someone would take the time to turn these archives into a real book, it would be the equivalent of a timberframing encyclopedia. Lots of sifting through stuff to find what you need, and very annoying to have to read it all on a computer screen, but well worth the $100 price. (which supports the guild)
Author: Ted Benson
Title: Timberframe : The Art and Craft of the Post-and-Beam HomeRating: 3.5 out of 5 -
niceType: Glossy Picture Book
Summary: This book is a collection of showcase houses. All of the houses feature exquisite craftsmanship and details. If you're looking for beautiful pictures, design ideas, and inspiration, buy this book. If you're building you own timberframe house from scratch, save your money and buy a nice sharp chisel. If you have a million dollars to spend on a timberframe house, buy this book first, so you know better than to buy a
Yankee Barn Homes house.
Authors: Someone good being paid by Riverbend
Title: The Riverbend Plan Book
Rating: 3.5 out of 5 -
nice Type: Corporate propoganda that transcends corporate propoganda
Summary: Riverbend has some of these best timberframe homes that I've seen, so I sprang $25 on their corporate planbook. Wow, I was surprised. The pictures are breathtaking and the book has useful information on planning and scheduling your timberframe. Each of their home plans includes a sketch of the bent design used for the house. Although this is unabashed corporate marketing, I'd put it on par with Benson's coffee table book. My wife and I kept flipping back to this book when we were looking for ideas for our house.
Authors: Steve Chappell
Title:A Timber Framer's Workshop: Joinery, Design & Construction of Traditional Timber FramesRating: 3 out of 5 -
helpfulType: A book meant to be a companion to a workshop
Summary: Similar to Sobon's books or Benson's first book in that it covers nearly all aspects of building a timberframe structure. More of a "workshop workbook," lacking the polish of the other timberframe books. Tries to be a little more rigorous on the engineering aspects of the structure. Steps you through some calculations of trusses. I found the book helpful while making joinery decisions for my frame. I bought the book largely for its discussion of hammerbeams (a subject that Sobon and Benson do not go into), but I found Chappell's description of the physics at work in a hammerbeam a little too simplified (if not flawed). His simplification of the hammerbeam is a conservative one, and will result in an overly conservative hammerbeam design - which is not necessarily a bad thing. In the back of the book, he has several sample timberframe designs (minus the actual timber drawings) that could be helpful. Buy this book if you have read everything about timberframing and feel like you want to hear another voice. Otherwise, just buy Benson and Sobon's books and leave this one at the library.
Authors: Dick Pirozzolo, Linda Corzine
Title: Timberframe Interiors Rating: 2.5 out of 5 -
ok Type: A picture book of timberframe interiors with ideas on decorating
Summary: A picture book worth thumbing through for ideas and inspiration. If you already have a timberframe home and want to redecorate, this would be the book for you. Mostly good ideas, but there's at least one gawd-awful picture of a timberframe painted white - I can't believe the authors really think it was a good thing for the homeowners to do that to their timberframe.
Authors: James Mitchell
Title: Build a Classic Timber-Framed House : Planning & Design/Traditional Materials/Affordable Methods Rating: 1 out of 5 -
not useful to me Type: A meandering how-to
Summary: I didn't know what to make of this book when I got it. I still don't know what to make of it, and by now I've lost it. I don't remember gleaning anything particularly useful from this book. Describes an odd type of construction with vertical posts, infilled with logs - without much reference to the more used forms of timberframing. It just wasn't what I was looking for, but I don't want to be too critical because someone else might find it useful.
Tina Skinner, Tony Hanslin
Title: Barn Style Homes: Design Ideas for Timber Frame Houses Rating: 0 out of 5 -
don't spend your money on this one! Type: Corporate marketing thinly disguised as a legitimate timber frame book
Summary: This book is a collection of pictures and floor plans of various houses built by Yankee Barn Homes. Very disappointing. I plan to sell my copy on ebay. List price is $39.95, but I wouldn't buy it at any price if I had it to do over again. Perhaps you would find this book useful if you like the yankee barn homes style of timberframing (no corner braces, no visible joinery, no visible floor joists, hidden and not-so-hidden metal fasteners, etc.). Yankee Barn Homes also offers what they call a design guide (three ring binder with corporate marketing) - don't buy that book either.

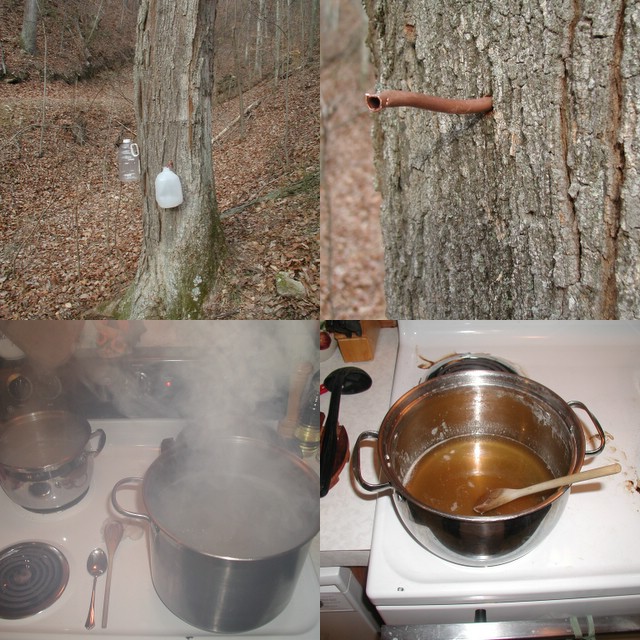 Friday I was cutting down a dead walnut tree (full of barbed wire fence... and bullets I later discovered at the sawmill.. but that's a different story), and the walnut brushed the branches of a maple tree as it fell. Immediately, it started raining dew drops beneath the maple tree. This dew was curious, because it was 3:00 in the afternoon. So I stretched out my hands and caught some of the drops falling from the maple tree. Then I tasted them... just as I suspected... sweet sap!