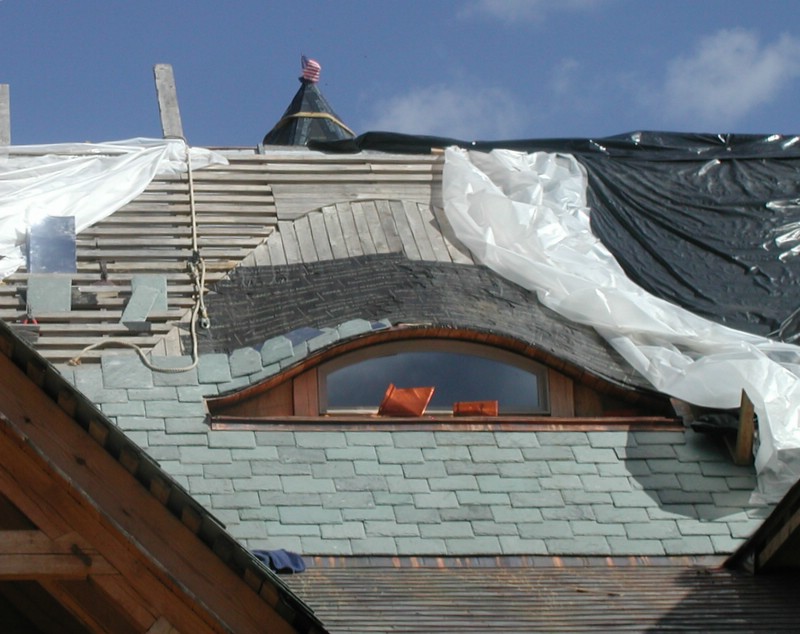
The eyebrow dormer has languished, unslated, on the west side of the roof for weeks. The fact that it was covered with a translucent piece of plastic helped me to ignore it,
and the challenge that it presented, as our attention was directed toward the SIPs. Recently though, I've taken the challenge back up, and it feels like I've got a handle on it.
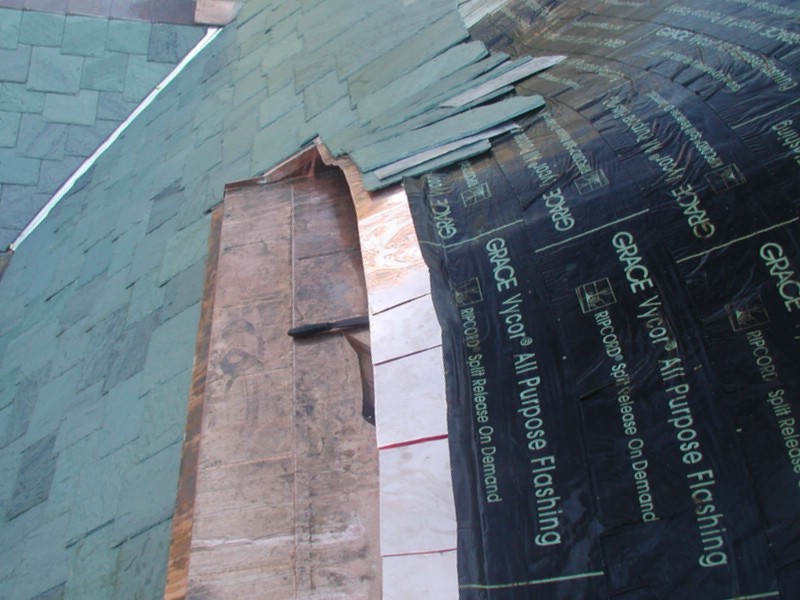
The breakthrough came when my wife (shopping for exotic sticky felt paper to cover the tower) happened upon a commercial roofing store that carried terne coated stainless steel. As far as I know, the purpose of the coating is to dull down the mirror finish of stainless, and to make it more solderable (solderability is not an issue for the eyebrow though). This particular terne coating (TCSII from Follasnbee, as referenced in the slate roof bible) has no lead, so it's a little more shiny than traditional terne coated steels, but definitely less toxic. More importantly, it's thin and "dead soft" so 36"x12" strips of it in .015 thicknesses lay fairly flat, even on compound curves. Normally, you would not flash between courses of slate, as you might with cedar shakes. But the slate roof bible recommends flashing between courses of slate when doing eyebrow dormers or slated (i.e. rounded) valleys. This material seems to be just the ticket.

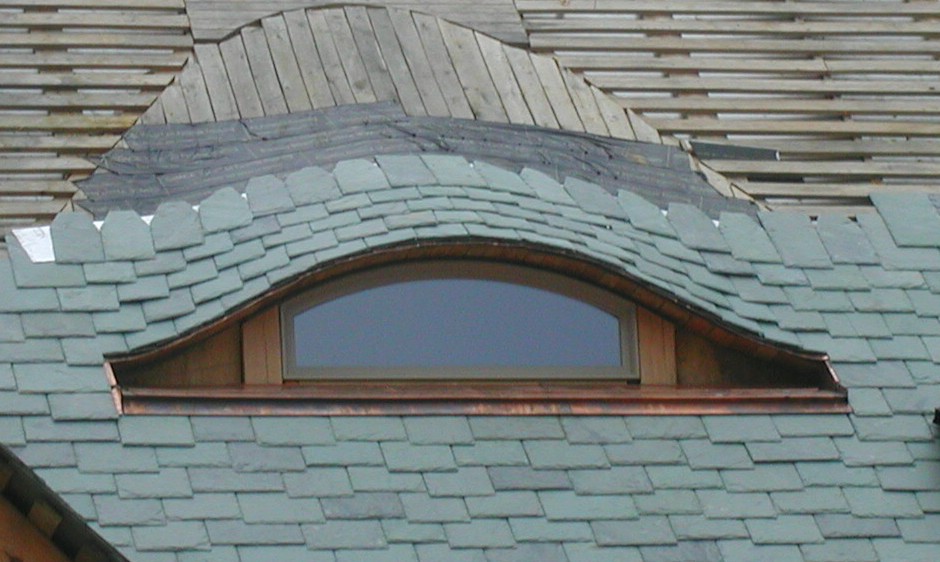
Although I fshioned numerous variations of curved copper drip edge for my eyebrow dormer, nothing worked very well. Ultimately I decided to just use overlapping flat 8"x5.5" sheets of 16oz copper as drip edge. (K.I.S.S.) Here's what a course of the copper flashing looks like. In this picture, you can also see the copper shelf that I had to build and flash into the slate just below the eyebrow dormer. If I had placed the glass window further outboard, I might not have had to build this shelf on the roof, but I would have had to build an odd shelf (window sill?) on the inside of the house. In any case, something was needed because the window is thin, but my roof contains 8" of polyiso insulation. (I think eyebrow dormers were traditionally built into uninsulated attics, so this shelf that I had to fabricate was not needed???)

Although I did not use a typical cant strip on the eyebrow to get my slates started, I did use starter slates beneath the first visible course of slates. Here you can see a course of starter slates - each starter slate for the eyebrow has a unique angle cut into the butt of it. (As elsewhere on the roof, the starter slates are applied face down.)
I tried to keep the sides of the eyebrow slates lined up with imaginary vertical lines of the
main roof. Another variation of the eyebrow dormer (suggested in the Slate Book) has the sides of the eyebrow slates parallel with the changing gradient of the curved portion of the roof. (their variation would be most similar to slating a conical tower top and might make more sense if you were trying to build a waterproof eyebrow without flashing) Their version would have all of your slate butts perpendicular to the flow of water (imagine again, slating a cone shape), whereas the version I chose has the butts of the eyebrow slates parallel with the butts of the normal roof slates.
Another style decision that I had to make before laying the first slate on the eyebrow was, "how to tie-in the courses of slate on the eyebrow with the courses of slate on the main roof?" The puzzle is this:
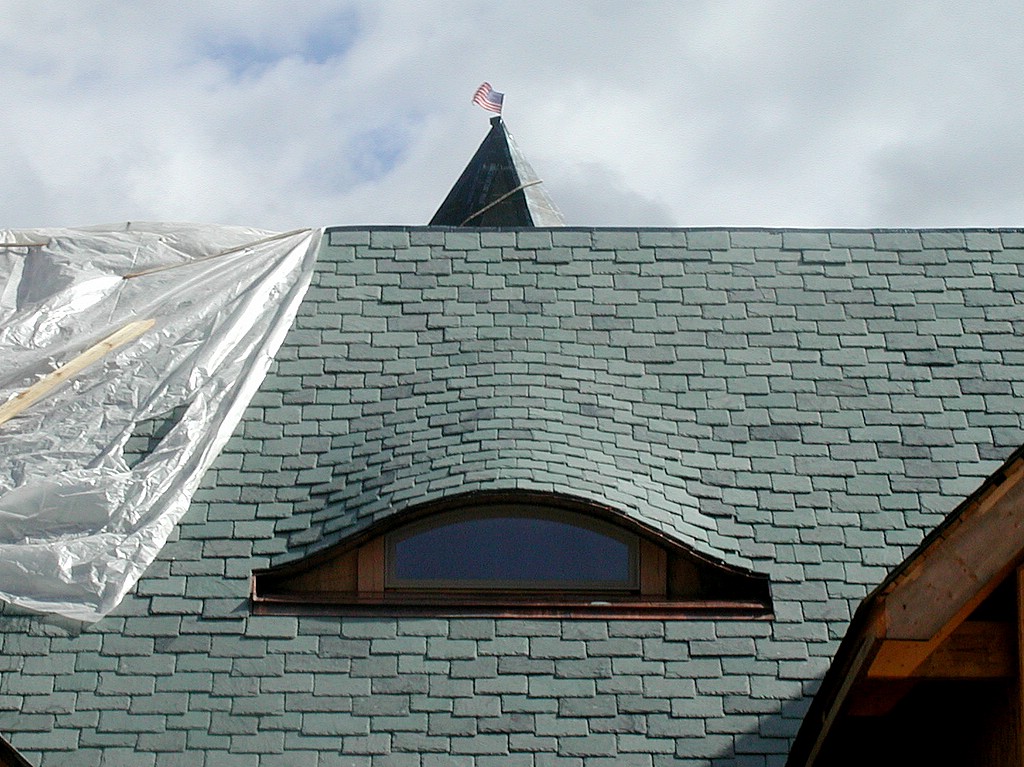
if you use the same exposure for the eyebrow slates as you do for regular roof slates, the eyebrow dormer does not need as many courses of slate. The Slate Book suggests laying your eyebrow courses literally in-line with the regular field slates. The result of their suggstion is that some courses of slate die-out right on the "eye lid" of the eyebrow dormer, if you will. After looking at pictures of this style, my wife and I didn't think that we cared for it, so I chose something different. I decided to vary (i.e."cheat") the exposure of the eyebrow slates so that no course of slate would die out, but each would flow in a continuous and curved fashion from the left side to the right side of the eyebrow and blend back into the field slates. Sorry if this is making your eyes glaze over... In this blog entry, my intent is barely visible, but when I finish the eyebrow dormer, the final pictures will tell the story better than words. (or I'll realize that I _am_ making no sense, and I'll rip it off and start over!)

Back to the mundane details for those who care: Over the starter slates (and over each course of visible slates), I am using the terne coated stainless as flashing, careful to cover the heads of my stainless slate nails with the flashing while still holding the flashing high enough so that it won't be visible. (the butts of each subsequent course of slate should just barely cover the flashing that overlaps the preceding course of slate.) Of course, the pieces of stainless flashing are lapped like shingles themselves, so when water runs downhill, it will run out of, not into, the roof!

A few more details, related here in machine gun fashion... Whereas the main roof has 9" to 14" wide slates, I'm using 8" wide slates on the eyebrow, with an occasional 6" or 7" slate thrown in here and there to get things to come out right. It's necessary to cut dog ears into the tops of the slates to get them to lay decently flat on the eyebrow frame. Occasionally I have to cut a trapezoidal slate to keep the slates running like I want. Although it makes luxurious temporary roofing, the Grace ice and watershield is pretty much unneccesary at this point, and somewhat annoying as asphalt resins have leached from it and stained my slate and copper below. I wouldn't want to drink rainwater from a roof that relied on these materials for waterproofing. I anticipate the leaching to stop once the ice and watershield is "dried in" by the slate and stainless.
I think the essence of a slated eyebrow dormer is to get a continuous organic form from squares of stone, so that's what I've been trying to achieve with this -- the only eyebrow dormer I'll probably ever build. As I was completeing the 3rd course of visible eyebrow slates yesterday, "S" said to me "that ain't no eyebrow, that looks like a turtle crawling across your roof." That was the best compliment I could have never anticipated.

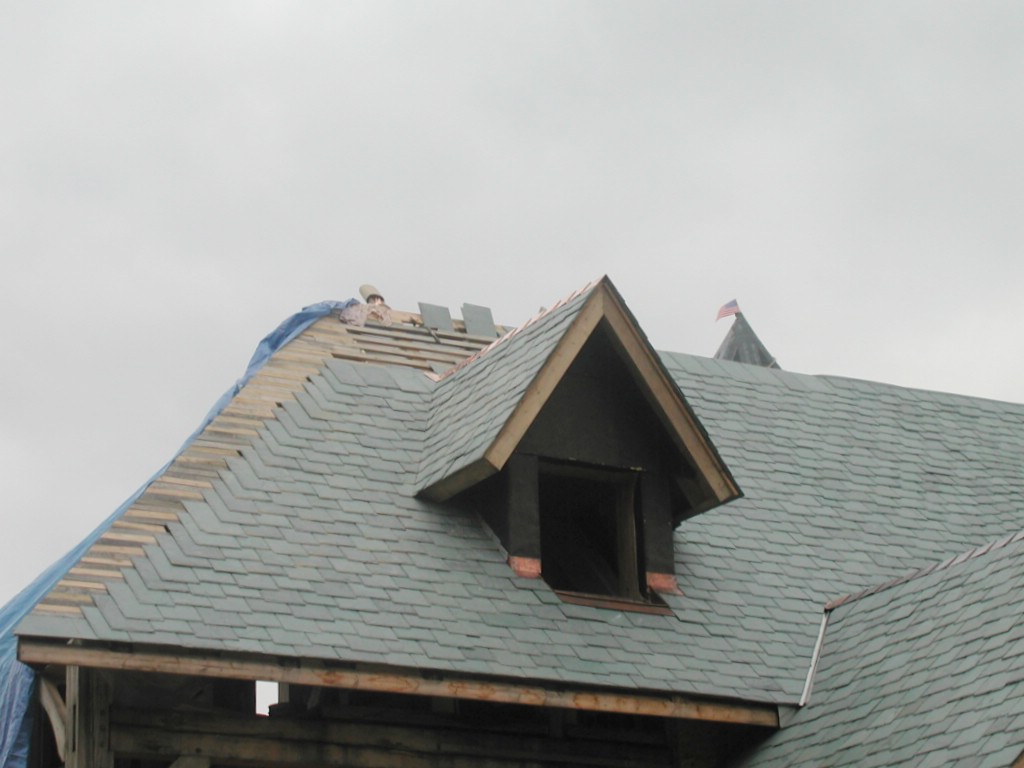
 We're almost ready (one week away?) to start slating the entire roof. Just to recap, on top of the timber frame are tongue and groove ceilings. On top of that is a vapor barrier. Then we have 2x10 rafters to create a space for the poly-iso insulation. On top of that are oak battens. And finally, slate. Here you can see the 2x10 rafters that create the insulation cavity (plus some air space above the insulation so the roof can vent properly). If I had it to do over, I think I would have made the entire 3rd floor of our house a simple attic space, instead of living space. I might have even forgone the timber frame trusses and used simple common rafters on 2 foot centers. It's been a lot of extra work to accomodate catherdral ceilings above this timber frame - almost like building the roof structure twice. I could have used SIPs for the roof (like I did the walls), but even though they would have gone on quicker, they would have been much more expensive and I still would have had to create some sort of batten system for nailing the slate. Oh well, too late to turn back now - I'm happy with the result - just frustrated that the "built up roof" is taking so long.
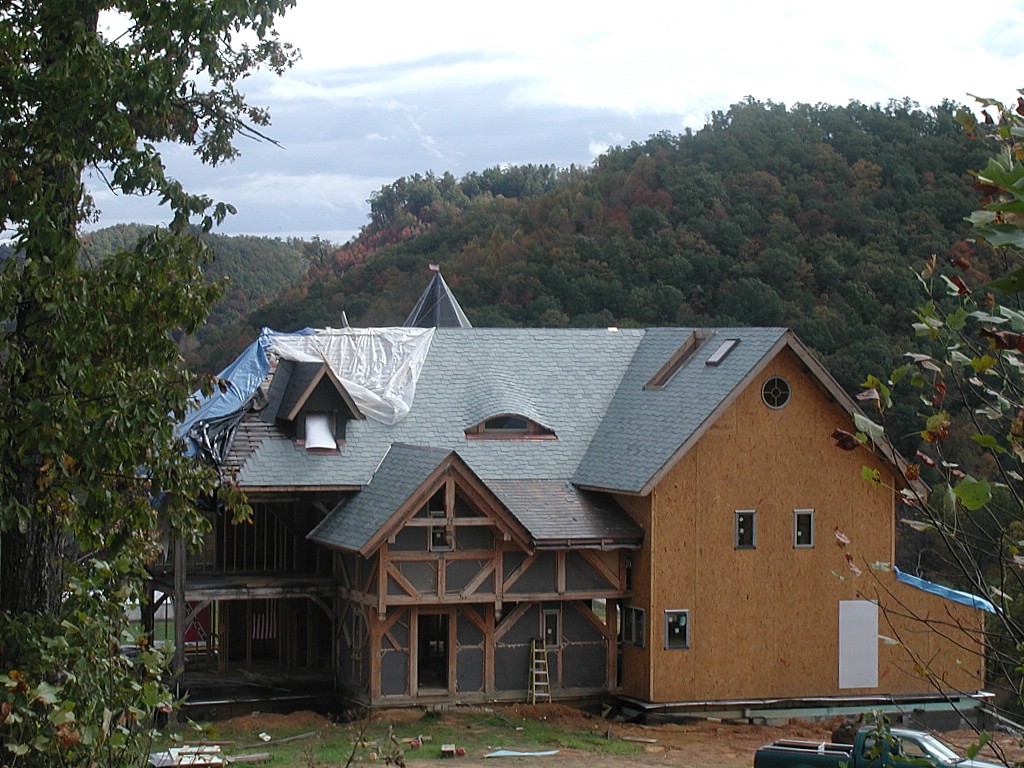
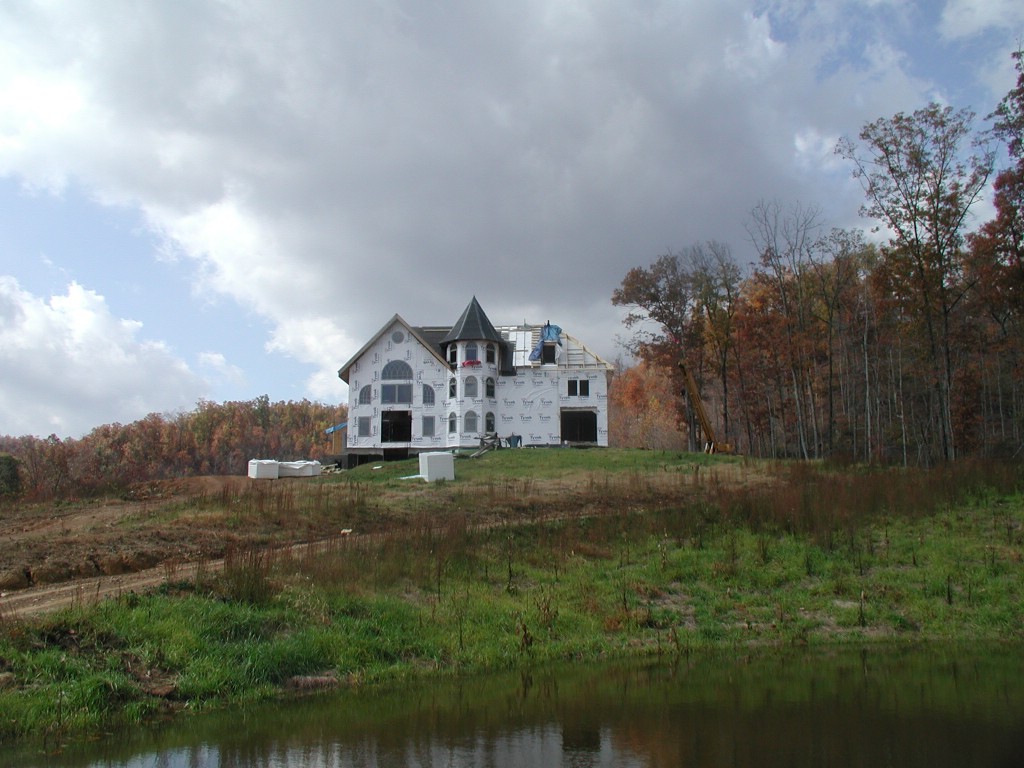 Here's a picture of the whole house as it stands now. There will be a dormer where the blue tarp hangs. The big hole in the front of the house (that looks big enough to drive a car through) is where a bay window will go. Actually, I'd call it a mini-turret, as it will extend 1.5 stories and be faced with stone. The 2 windows above the bay window will allow access (for only limber people!) to a small "castellated" balcony on top of the turret. The big white space (devoid of any windows) between this mini-turret and the main tower will eventually have an arched entryway that will frame the main entrance to the house. If I have any energy left at that point, I want to attempt building a "cruck frame" for this entryway.