Wednesday, June 21, 2006

The house site is greening up!!


The sun was starting to shine and the fog was just beginning to lift as I went to work on the house yesterday. In this picture you can see that things are starting to green up (and we've finished our first cutting of hay.) Tired of looking at dirt and mud everywhere, I sowed the front yard of our house site with winter wheat and fescue and covered it with some old hay. Its coming up nicely.

Infill update

We finished insulating and stick framing the infill portion of the house and we've moved on to the roof. In this picture, you can see the chicken ladder we built to make it easier for us to climb out of the dormer opening and over the peak of the litttle gable. Now that we have all of the tongue and groove ceilings on, this is our easiest pathway out on to the main roof.

The roof insulation you see here was our very first attempt - I call it our prototype. In the next blog entry, I'll show you some more details of the other sections of the roof.

Building with green timber...

One particular walnut had its entire top busted out during the ice storm, but the following year, it grew a bunch of new branches in the top of the tree, and it resembled a giant lollypop. Impressed by the display of folliage, but sure that the misfigured tree would eventually die due to the ice damage, I decided to cut the tree down. I cut a notch in the side of it and then I cut through the heart of it. I had cut through nearly 90% of the tree's trunk, but my saw was dull or I ran out of fuel or something else distracted me, and I left the tree standing precariously for another season. Miraculously, the tree leafed out the next year as well. I returned to the tree with a sharp saw full of fuel, and finally dropped it just this spring (it was full of sap). I had a special place in the basement planned for it.

I have another post (aka the BHP, or Big Honking Post) in the basement with partial bark on it, so I decided to do the same with this tree and call it the LHP (Little Honking Post). At the sawmill, I merely cut the bark off of the side that would be against the wall, and then cut half of the bark off of the side that would be seen. Because this post was not really in my plans at the time I poured the foundation, there was no plinth for it, so it rests directly on the basement slab. No fear though, it does not support much of the frame above it. I did however splice a piece of stainless into my flashing and ran it down the basement wall and beneath the post, so that if termites should ever make it through a crack in the slab, they won't be able to eat their way into the bottom of this post.

Now for the amazing thing... this tree is leafing out again in my basement. It has formed 4 new branches (albeit small branches), and everyday they are growing larger. The tree has no roots whatsoever, but every time it rains it receives water. And because I haven't put SIPs on my frame yet, sunlight filters into the basement. I have seen this happen with only one other tree in my lifetime - a few years ago, a locust fencepost that I set in the ground decided to leaf out one more season. Who knows how much longer this walnut will grow in our basement!?

Friday, June 16, 2006

Non-Transparent Walls - what a concept!

Apart from the inconvenience of having to walk through door frames, and look through window openings, yesterday we found "walls" to be a welcome addition to our house. Most of our house will be covered with SIPs (more on that later), but for part of our house, I decided to implement a modern-adaptation of the old style infill method used in medieval times in Germany and England. Although not as energy efficient or as maintenance free as SIPs, what I like about this method of enclosing a timberframe is that it lets you see the timbers on both the outside and inside of the house.

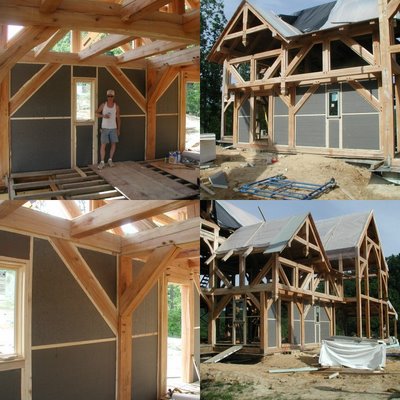
Instead of waddle-and-daub (sticks, mud, and cow manure), we used store-bought 2x4's (ripped down to exactly 3") and 3" thick PolyIso 95 insulation made by Firestone. (For the record, I wanted to have every stick of wood in this house come from our farm, but now we're now up to 3 dozen 2x4's and 12 sheets of plywood bought from the store.) On the inside, I intend to add another 1" of insulation and 1/2" of drywall to cover the thermal breaks of the 2x3's and timber braces (so on the inside, you'll see the timber posts and beams, but not the timber braces). On the outside, I'll use some kind of cement board and stucco, leaving all of the timbers exposed out there.

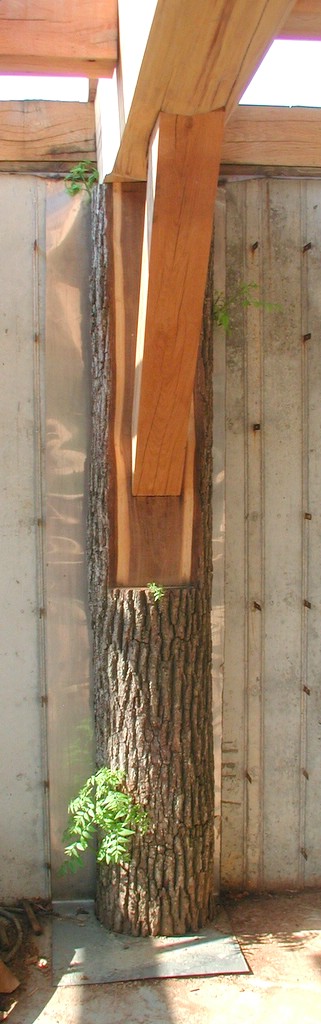
To combat rot and decay, I made sure to use only white oak timbers on this section of the house, since the heart-wood of white-oak has a natural resistance to rot. (Its pores are water-tight - that's why they use it for whiskey barrels.) I also built in 2 feet of roof overhang, and the 2nd floor overhangs the first floor by an additional 2 feet, so even wind-driven rain will have a hard time getting near these timbers. Finally, I used Olympic Water-Guard (a mixture of naptha, parrafin, and linseed oil) instead of straight linseed oil on these timbers.

In the upper lefthand picture, that's my brother-in-law proudly posing next to his stick-framed window opening.

Thursday, June 15, 2006

Eyebrow Dormer - inside

The eyebrow dormer is another one of those features that goes under the heading of "My wife insisted on it." I had no clue how of to build an eyebrow dormer, and neither did my brother-in-law, but he instinctively knew how to get started... "just have her order the window and when it gets here, we'll build around it." So that's what we did.

Long ago while planning the frame, I knew there'd be a dormer in this area, so I was careful to make sure that purlins were spaced appropriately in the frame. (Of course, in the back of my mind, I was ready to fall back to a "shed roof dormer" if only my wife would let me.) But she didn't relent - she ordered the window. When the window arrived, we carefully lifted it into place and discovered that the proper height was just a couple of inches above the lower purlin and the dormer would clear the upper purlin by a few inches (whew!). To get the height just right, we nailed some 45 degree blocks and a few 1" spacers on the purlin. Then we cut two mini-timber-posts to sit to the right and left of the window. We then nailed the window and the mini-posts to the purlin and plumbed everything. Finally, we took a strip of wet plywood (the 3/4" cabinet grade stuff that has oak veneer with poplar plys is especially bendy) and bent it over the window, nailing the plywood to the window and to the miniposts at each end.

The really tricky part came when it was time to cut the tongue and groove. We ran the tongue and groove for the 12:12 roof, and then using a square and level, projected the curve of the window back on to the 12:12 roof. I used a skil-saw (circle saw) to cut the curve out of the main roof. (again, my brother-in-law was right, you can cut curves with a circular saw - just don't set the blade to run any deeper than absolutely necessary.) Then using a miter-saw, we cut the compound angle for every piece of dormer-tongue-and-groove. This was tedious work, as every pair of angles for every piece of tongue and groove was different, and a lot of it was trial-and-error. I used mainly 3" and 4" tongue and groove (avoiding the 5" 6" and 7" stock) pieces to better approximate the arc of the window. And to simplify the cutting a bit, I let the tongue and groove run wild, past the outside of the window (see picture)... I'll cut all of those ends even later when I decide how much overhang to incorporate into the dormer.

Placing this window and making the tongue and groove look right took about 24 person-hours of time (two people, one and a half days). I expect the slate on the outside to be even more tedious. But it will all be worth it - this may be the only eyebrow dormer I ever build in my lifetime.