Well, it happened again... I learned why not to ignore the warning labels on chemical products! In a sort of marathon session, my wife and I finished the hardwood floors in 6 large rooms and 3 walk in closets in less than 4 days. In the process, we created a lot of dust. Dangerous dust it turns out.
After nailing down the new flooring, I sanded the floors with an orbital floor sander rented from Lowes. (my previous effort at floor finishing convinced me that I don't have the magic touch required to get good results from a commercial drum floor sander.) First, I used 36 grit, then 60 grit, then 80 grit. After the floors were reasonably smooth, we applied a coat of oil based polyurethane using a lambs-wool applicator. When the first coat had dried (about 12 hours later), we sanded the floors lightly with 220 grit sand paper and vacuumed up the residue with a 6 gallon shop-vac, followed by a thorough wiping with a tack cloth. Then we applied the second coat and repeated the same procedure before applying the third coat.

The first day we had the sander rented (I was hoping I would only need it for one day!), I stayed up until 3:00 am sanding floors. OK, I could see it might take two days, but by golly, I wanted to get my $35-per-day's worth from that machine. Three and a half days later, exhausted and covered in dust (the respirator only covers your face!), I was glad to return the sander back to Lowes. The lady at the counter (the same lady I rented the machine!) had pity on me and the four kids and only charged me for one extra day.

That weekend, I made good on a long overdue promise and took the family camping. We didn't have enough room to take all of the kids and the gear on our Polaris Ranger in one trip, so my wife volunteered to stay behind fora while until we had the campsite set up. While she was waiting on us, my wife decided to vacuum some dirt in the sunroom. When I came back to pick her up, she said "You can really smell the polyurethane dust in this shopvac." A dim synapse in my brain flickered and then fired... "Um, I remember reading on the label that the dust from buffing polyurethane can spontaneously combust. Just to be safe, I'll empty the bag." With that, I removed the disposable bag from the shop vac, threw it in a plastic trash bag and tossed it into the back yard. We went camping and never thought a thing about it. Until...

Two days later, I was mowing ironweeds in the cow pasture about a quarter of a mile from our house site. I thought I saw a puff of smoke from the house site. Was it my imagination? I strained to see if it was really smoke. It looked like smoke. I put the tractor in high gear and started booking it up the hill, hay cutter in tow. The closer I got, the more I could see that it really was smoke, and it looked like the house was on fire. I was terrified until I realized the fire was coming from the backyard. There sat glob of burning trash on fire. I put the fire out and wondered why anyone would burn a bag of trash in our back yard. It literally took at least a minute for me to realize that the bag of polyurethane dust had caught on fire by itself. The warning label had said it could, but I never imagined it would happen.

I shudder to think about what might have happened if the bag of polyurethane dust had been left in the plastic shop vac inside the house. If one good thing comes from this blog, perhaps it will be that someone will read this and remember to dispose of that polyurethane dust safely. The same goes for oily rags... they catch on fire too - I've seen it happen with linseed oil.
Less about fire, and more about flooring in my next post...


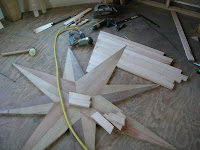
 We're at least 24 months behind our original schedule for completing this house, but at this point we've found a certain liberation in knowing that the schedule has been completely blown. As if we needed something else to slow us down, my wife and I decided to try inlaying a compass rose medallion in our third floor tower room. The conversation went something like this "You know a few days after we start this, we're going to wonder why we didn't just do it the simple way... I mean, this is going to add at least a week to our move in date." "Yeah, so what." So goes many of our conversations these days, and it matters not who says which piece.


