
Timber movers
Stacking and moving over 200,000lbs of timbers multiple times is no small task. The problem was how to fit the long timbers in the barns (they have relatively narrow doors), without hand stacking them? My solution was to beg, borrow, or steal every old farm wagon/trailer that I could find, stack the timbers on the wagons once (and only once!) as we finished notching them, pull them into the barns for storage, then pull them up to the house site (up to a year later) when we needed them. Here's how our wheels stacked up:
 Name: Rusty.
How acquired: purchased for $25 at a farm auction, spent over $50 in gas getting her home. I considered this a steal!
Description: Don't let the rust fool you, this 50's/60's model full-ton truck-frame-turned-hay-wagon is a stout timber mover.
Best Feature: Factory 8 lug wheels and tires that hold air for weeks on end. "Shocks... pegs... lucky!"
Worst Feature: The steering linkage leaves much to be desired. She swerved violently and repeatedly into oncoming lanes of traffic when I tried pulling her back from the farm auction at anything faster than 5 mph (at night, with flashlights taped on for tail lights). Under the theory of "best to act first and ask forgiveness later", I abandoned her at a gas station 45 miles from home (3 miles from the auction), in spite of the too-busy-to-stop-me cashier staring in disbelief as I unhitched her on his tarmac. I returned the next day with a car-trailer and come-a-long, and brought her back home where she happily hauls and stores at least 10,000 pounds of timbers.
 Name: Green Machine.
How acquired: Came with the farm that I bought from my father-in-law.
Description: With the original wooden bed rotted off, this puppy had long been retired from hay service. We added four timbers to the chassis and she rolls again.
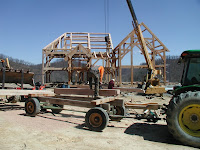
Best Feature: The transverse pegged timber bed serves as mobile saw horses for really long timbers. Here you see a timber receiving a last minute mortise on site while being supported safely by the green machine.
Worst Feature: Front wheels are held to the back wheels with only one rusty shaft. With very little to attach a ratchet strap or proper tie-down to, she loses her timbers on steep inclines and bumpy roads. (uhh, that would be the path to our house)
 Name: Low-rider.
How acquired: Borrowed from a brother-in-law who took it in on trade.
Description: Your basic hay-wagon with the bed rotted off, sporting a bold yet stylish yellow frame that matches the rims on my tractor.
Best Feature: Cool low profile tires on front (from a Chevy Fiero?) and big Herman Munster tires on the rear help keep our timbers from sliding off the back of the wagon while going up the steep road to the house site.
Worst Feature: Tires go flat quickly when left in barn with over 10,000 pounds of 26 foot long timbers stacked on it.
 Name: Fenders.
How acquired: Bought many years ago for hauling atv's.
Description: A car hauler that led an easy life until coming to the farm - now depreciating quickly. Hauled eight 1200lb rolls of hay at a time before going into timber service.
Best Feature: In spite of a recent $99 citation in Ohio to the contrary (some nonsense about tailights, turn signals and expired license), this trailer is road-worthy and has working brakes. Makes trips to Lowes after being retired from timber duty. Here you see her hauling standing seam metal.
Worst Feature: Fenders always getting in the way - requires 8" of donnage to load and unload with forks. Was speared through the fenders with a hay spear (by alcholic farm hand, no longer employed here) before going into timber service. Wrinkled/squashed fenders tend to rub tires when hauling heavy loads.
 Name: The Gospel Wagon.
How acquired: Bought from a friend for $300. In an earlier life, it hauled equipment for a gospel band. Then, it became the inspiration for its next owner, "the spirit man," who hauled his racing go cart equipment in it.
Description: Although it has never hauled a timber, this is our most revered wagon and I would be remiss for not including it in this lineup. It holds our persuaders, chisels, slicks, mallets, and other assorted tools.
Best Feature: It has a roof for keeping tools dry, and it can be moved around by hand if it is ever in the way.
Worst Feature: If you step into it while it's unhitched and unchalked, it will pop a wheely, dumping you and the tools out the back door. If, perhaps through divine intervention, you somehow manage to circumvent the wheely by shifting your weight forward, it will roll downhill with you in it.
I've at least one more hay wagon to add to this lineup, but I can't find a picture of it on the hard drive. No fear, that particular wagon still has our porch timbers on it, so I'm sure it will be back in the picture within a year!
 Name: Rusty.
How acquired: purchased for $25 at a farm auction, spent over $50 in gas getting her home. I considered this a steal!
Description: Don't let the rust fool you, this 50's/60's model full-ton truck-frame-turned-hay-wagon is a stout timber mover.
Best Feature: Factory 8 lug wheels and tires that hold air for weeks on end. "Shocks... pegs... lucky!"
Worst Feature: The steering linkage leaves much to be desired. She swerved violently and repeatedly into oncoming lanes of traffic when I tried pulling her back from the farm auction at anything faster than 5 mph (at night, with flashlights taped on for tail lights). Under the theory of "best to act first and ask forgiveness later", I abandoned her at a gas station 45 miles from home (3 miles from the auction), in spite of the too-busy-to-stop-me cashier staring in disbelief as I unhitched her on his tarmac. I returned the next day with a car-trailer and come-a-long, and brought her back home where she happily hauls and stores at least 10,000 pounds of timbers.
 Name: Green Machine.
How acquired: Came with the farm that I bought from my father-in-law.
Description: With the original wooden bed rotted off, this puppy had long been retired from hay service. We added four timbers to the chassis and she rolls again.
Best Feature: The transverse pegged timber bed serves as mobile saw horses for really long timbers. Here you see a timber receiving a last minute mortise on site while being supported safely by the green machine.
Worst Feature: Front wheels are held to the back wheels with only one rusty shaft. With very little to attach a ratchet strap or proper tie-down to, she loses her timbers on steep inclines and bumpy roads. (uhh, that would be the path to our house)
 Name: Low-rider.
How acquired: Borrowed from a brother-in-law who took it in on trade.
Description: Your basic hay-wagon with the bed rotted off, sporting a bold yet stylish yellow frame that matches the rims on my tractor.
Best Feature: Cool low profile tires on front (from a Chevy Fiero?) and big Herman Munster tires on the rear help keep our timbers from sliding off the back of the wagon while going up the steep road to the house site.
Worst Feature: Tires go flat quickly when left in barn with over 10,000 pounds of 26 foot long timbers stacked on it.
 Name: Fenders.
How acquired: Bought many years ago for hauling atv's.
Description: A car hauler that led an easy life until coming to the farm - now depreciating quickly. Hauled eight 1200lb rolls of hay at a time before going into timber service.
Best Feature: In spite of a recent $99 citation in Ohio to the contrary (some nonsense about tailights, turn signals and expired license), this trailer is road-worthy and has working brakes. Makes trips to Lowes after being retired from timber duty. Here you see her hauling standing seam metal.
Worst Feature: Fenders always getting in the way - requires 8" of donnage to load and unload with forks. Was speared through the fenders with a hay spear (by alcholic farm hand, no longer employed here) before going into timber service. Wrinkled/squashed fenders tend to rub tires when hauling heavy loads.
 Name: The Gospel Wagon.
How acquired: Bought from a friend for $300. In an earlier life, it hauled equipment for a gospel band. Then, it became the inspiration for its next owner, "the spirit man," who hauled his racing go cart equipment in it.
Description: Although it has never hauled a timber, this is our most revered wagon and I would be remiss for not including it in this lineup. It holds our persuaders, chisels, slicks, mallets, and other assorted tools.
Best Feature: It has a roof for keeping tools dry, and it can be moved around by hand if it is ever in the way.
Worst Feature: If you step into it while it's unhitched and unchalked, it will pop a wheely, dumping you and the tools out the back door. If, perhaps through divine intervention, you somehow manage to circumvent the wheely by shifting your weight forward, it will roll downhill with you in it.
I've at least one more hay wagon to add to this lineup, but I can't find a picture of it on the hard drive. No fear, that particular wagon still has our porch timbers on it, so I'm sure it will be back in the picture within a year!
posted by Thomas Massie at Tuesday, February 20, 2007
0 comments
![]()


